• Portfolio
  • About
  • Contact
  • Shop
mandee made

hand painted windows, signs & chalkboards

  • Portfolio
  • About
  • Contact
  • Shop

Wedding Wednesday: Tchotchke Centerpiece/Favors


...and with a little less than 5 hours left of this beautiful, rainy Wednesday I bring you:
 
                                                                                                              Picture by Kristen Mallory
WEDDING WEDNESDAY: 
TCHOTCHKE EDITION! 

For a full year before my wedding I collected tchotchkes from junk shops, second hand stores, garage sales and of course, Etsy to create my combination centerpiece/favors. 
There were a couple of rules for collecting these hollow treasures, they needed to be:
a. planters
b. under $7 (american currency) and
c. a little "off"....not exactly ugly, just "off".
To make them into centerpieces was truly a family affair.  We (my 4 year old flowergirl, Sister and I) planted succulents in all of the tchotchkes, put them on wooden disks (cut especially for me by my loving Father), accompanied them with precious little terra cotta pots filled with small white flowers (put together by Lady, my Mom) added hand stamped signs (Made by Liz) that said, "take me home tonight!" and then they were all artfully arranged on each table by my BFF, Gina Marie.
Pictures by Meredith Mascola
The results were 100% unique, semi home-made, adorable little bits of precious that I could hardly stand to give away!!  These were SUCH a huge hit I was blown away!  People were hiding them from each other and stealing them off tables all night.  I personally saw the squirrel change hands at least 3 times, I'm still hearing stories about who the rightful owner should be.  And now the fun part is finding out where all of them went.  I love going to friend's houses and seeing which planter everyone ended up with (aka who swiped what while no-one else was looking!) 
  
tags: Liz, antiques, custom, dogs, etsy, faux bois, kittehs, kristen, make me, paper craft, signs, tchotchke, the noop, wedding wednesday, wedding
Wednesday 10.19.11
Posted by mandee rae
 

National Seafood Bisque Day

October 19th is National Seafood Bisque Day and today is October 19th!! 

Happy National Seafood Bisque Day!!

Here is a recipe for Seafood Bisque:

Shrimp Bisque

Ina Garten
2006, Barefoot Contessa at Home, All Rights Reserved
Show: Barefoot ContessaEpisode: Breakfast, Lunch and Dinner
  • Recipe categories: Flour, Shellfish, Shrimp, Vegetables, Tomato, 
    more
  • Recipe
  • Ratings & Reviews(134)
Picture of Shrimp Bisque RecipePhoto: Shrimp Bisque Recipe
Rated 5 stars out of 5
  • Rate This Recipe
  • Read 134 Reviews
Total Time:
--
Yield:
4 to 6 servings
Level:
--
  • Print Recipe
  • Full-Page Viewnew
  • Save to My Recipe Box
  • Review Recipe
  • E-Mail
  • Share It!
  • Tweet

Ingredients

  • 1 pound large shrimp, peeled and deveined, shells reserved
  • 4 cups seafood stock
  • 3 tablespoons good olive oil
  • 2 cups chopped leeks, white and light green parts (3 leeks)
  • 1 tablespoon chopped garlic (3 cloves)
  • Pinch cayenne pepper
  • 1/4 cup Cognac or brandy
  • 1/4 cup dry sherry
  • 4 tablespoons (1/2 stick) unsalted butter
  • 1/4 cup all-purpose flour
  • 2 cups half-and-half
  • 1/3 cup tomato paste
  • 2 teaspoons kosher salt
  • 1 teaspoon freshly ground black pepper

Directions

Place the shrimp shells and seafood stock in a saucepan and simmer for 15 minutes. Strain and reserve the stock. Add enough water to make 3 3/4 cups.
Meanwhile, heat the olive oil in a large pot or Dutch oven. Add the leeks and cook them for 10 minutes over medium-low heat, or until the leeks are tender but not browned. Add the garlic and cook 1 more minute. Add the cayenne pepper and shrimp and cook over medium to low heat for 3 minutes, stirring occasionally. Add the Cognac and cook for 1 minute, then the sherry and cook for 3 minutes longer. Transfer the shrimp and leeks to a food processor fitted with a steel blade and process until coarsely pureed.
In the same pot, melt the butter. Add the flour and cook over medium-low heat for 1 minute, stirring with a wooden spoon. Add the half-and-half and cook, stirring with a whisk, until thickened, about 3 minutes. Stir in the pureed shrimp, the stock, tomato paste, salt, and pepper and heat gently until hot but not boiling. Season, to taste, and serve hot.

* Shellfish

Warning: Consumption of raw or undercooked shellfish may substantially increase the risk of foodborne illness.
tags: food, national food holidays, other peoples art, under da sea
Wednesday 10.19.11
Posted by mandee rae
 

Happy National Chocolate Cupcake Day!


Well this is embarrassing...
how did I let it get so late in the day without wishing you a happy national chocolate cupcake day?

I'm sorry if I let you down.
tags: anthropomorphic, food, freak outs, national food holidays, quote bubbles, stick figures
Tuesday 10.18.11
Posted by mandee rae
 

Make Me: Faux Bois Planter


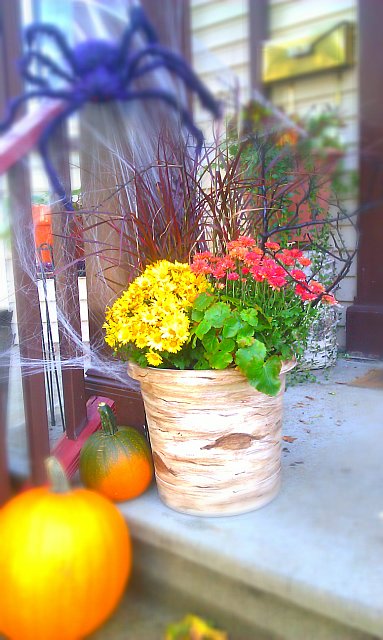
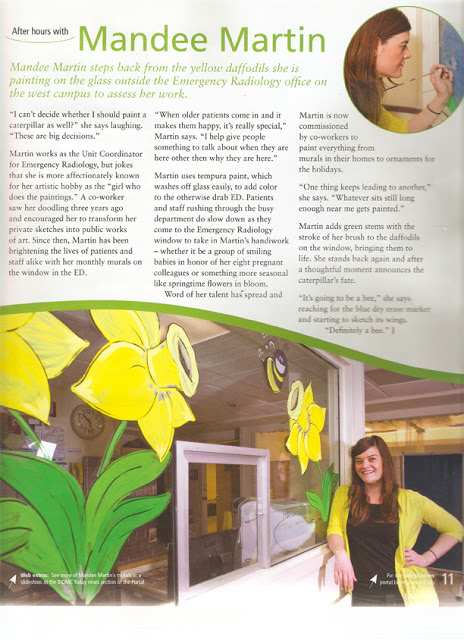
This weekend my friend Jennifer, a professional freelance gardner & general crafty-person, and I made this adorable Faux Bois (that's fancy talk for "fake wood") Planter.  It was so so so easy and the finished product had us beaming with pride.

Here's how we did it:

First, gather your supplies.


You're going to need:

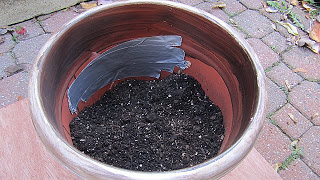
  • an old plastic planter (ours had a big crack in it that we fixed with duct tape, trash to treasure!)
  • some Fall plants
  • potting soil
  • white and brown acrylic paint
  • a few old paint brushes: 4" brush, 2" brush and 2 detail brushes
  • acrylic sealer
  • black spray paint
  • twigs gathered from the yard
  • scrub brush
  • Jennifer to make your flowers beautiful


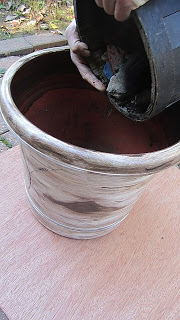
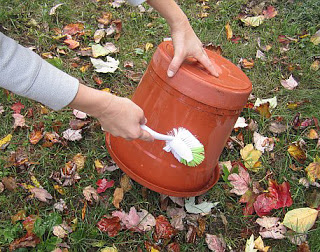
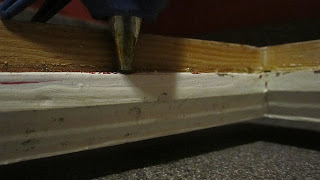
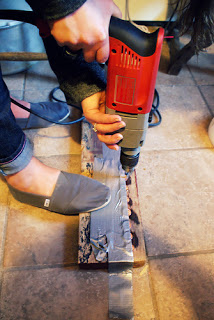
Step 1: The first thing you'll want to do is give your pot a good scrubbin' using an old brush and some water. 


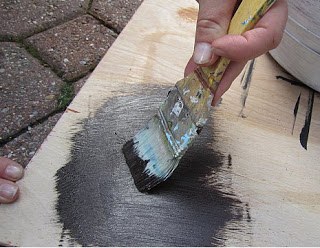
Step 2: When the pot is dry, begin painting the entire surface with white acrylic paint (white house paint will also work) using your 4" brush.   I used a heavy body acrylic in a horizontal motion to mimic the rings of bark on an aspen tree.  This layer should leave some of the original pot color showing through for depth, it doesn't need to be solid white.  This also does not need to be perfect- do however much or however little feels right to you.

Once you've painted the entire surface of the pot white, let the paint completely dry (mine took about an hour) before the next step: adding the details.
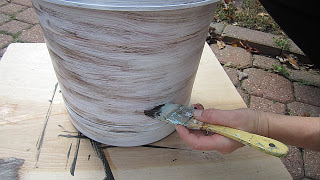
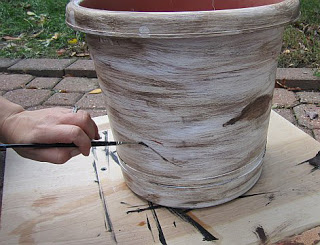
Step 3: To give the pot the appearance of being wood, we obviously need rings on our tree.  To achieve this look take your 2" brush, dip it in a heavy body brown acrylic paint (or any color that suits you) and then on your work surface, swipe the brush back and forth until the bulk of the paint is removed and very little remains on the brush itself. 
Then, with that barely there paint on your brush, begin lightly brushing rings on to your pot.  Start with less and then keep adding them until you're happy.  At this point, you'll probably think you're doing it wrong and it'll never look right- at least I did.  Don't worry, it's really easy, it'll all come together in the end. 
Right after you finish painting the brown, dip a 1" brush in water and begin blending the brown paint into the white with soft back-and-forth motions.  The brown will soften and some of the color will mix making the base color less white.
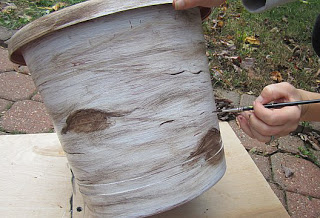
Step 4: Once you're comfortable with your bark, add a few eyes to make the wood more realistic.  I was nervous before starting the eyes but they were surprisingly simple.  Using a small round brush i created the top of the eye, like you're drawing a small hill and filled it in lightly with brown paint.  Then, using the same 1" decorative brush from before, I blended the paint and amd that's it- an eye!
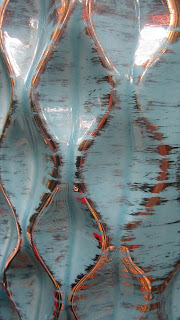
The finishing detail is to add some darker lines with your small brush here and there around the pot to give it wear and make it seem more 3D, like the squiggles below.
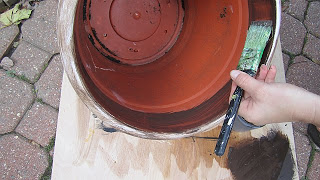
Optional: I also chose to throw some brown paint inside the brim of the pot in case the flowers don't cover all of the terra cotta color.
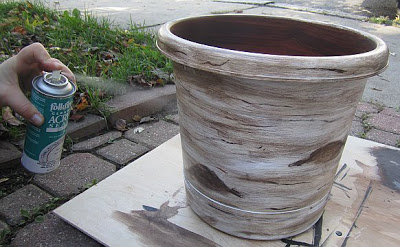
Step 5: The final step for painting the pot is to seal the paint with an acrylic sealer so that your paint doesn't bubble up or detach from the pot after it rains.  I used a matte finish sealer by Plaid.


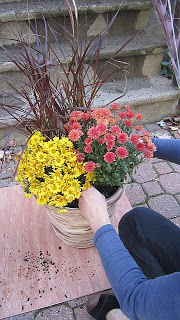
Step 6: Now for the planting!  Grab Jennifer from your supply list and let her at it.  My friend Jennifer is a natural at container gardening and actually gets paid to make people's porches beautiful so I was lucky to have her come show me what to do with the minimal plants I bought for this project.   
The first thing she did was dump some rocks in the bottom of the planter for drainage.  Then, when she was adding soil, we noticed the crack in the side of the planter was bigger than we thought, no problem.  We duct taped the hole from the inside and were all set. 
Next, start adding your plants.  Jennifer told me that when you're transplanting something you should always tear the roots a little at the bottom to encourage rooting in their new environment. 
She loosley arranged the plants on top of the soil to make sure she had the right placement and when she did we buried them in the soil and added more soil to the top. 
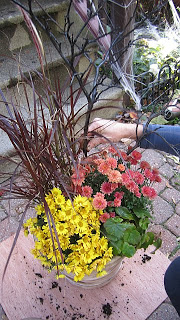
It looked fabulous...but Jennifer thought something was missing....
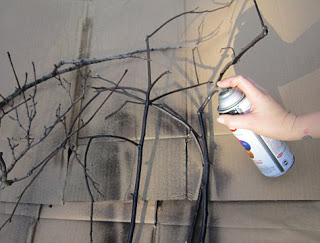
She gathered some twigs from the yard and asked if I had any black spray paint, luckily I had the butt-end of a can of black spray paint on hand and we sprayed the twigs she had gathered black and then put one of them in the planter...
...and Viola!!


NOW we're done!  The black twig added the perfect creepy Halloween feel to my autumn planter!! 

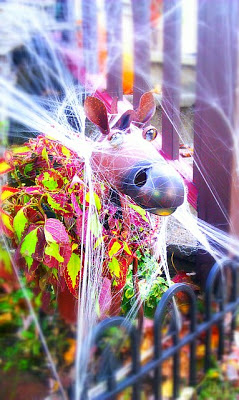
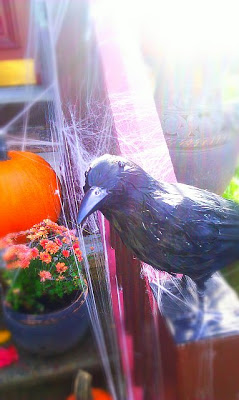
Now all that was left to do was put spiderwebs on every single thing on my porch and call it a day!


Happy Halloween!
tags: faux bois, halloween, how to, make me, other peoples art, trash to treasure, tutorials
Monday 10.17.11
Posted by mandee rae
 

FEATURED!!

I was featured in my work's quarterly magazine, the BIDMC Quarterly, this month for my window paintings in the EU!  It's not Juxtapoz but it's a start.  Check out the full page article below:

The rest of my window paintings can be seen here.  Enjoy!
tags: custom, featured, freak outs, murals, nursery paintings
Friday 10.14.11
Posted by mandee rae
 

Make Me: Teeny Tiny Blueberry Cobbler Jars

This weekend I went to my very first potluck wedding.  The idea was to have each guest bring a dish- either appetizer, entree, main dish or dessert- to feed 6-8 people.  A risky move and I'm happy to report that it was wildly successful!

My own contribution was a recipe I had found on NotMartha.org a while back and couldn't wait to make-  Mini blueberry cobblers in mason jars.  Adorable!  Megan from NotMartha has a wonderful tutorial on this project with great pictures, easy to follow directions and some very helpful tips.

Megan's recipe calls for 8oz. half pint jars.  I decided to use even smaller 4oz. mason jars for my own-


Teeny Tiny 
Blueberry Cobblers 
in Jars


_______________________________________


The first thing you should always do when cooking with/in mason jars is to thoroughly wash and sanitize the jars with hot hot water and put them out to dry.  I used chopsticks under one side to make sure they dried completely.  I used 36, 4oz. jars vs. 24, 8oz. jars in the original recipe. 


 Next, gather ingredients, rinse blueberries and preheat oven to 375 degrees.


Ingredients for Blueberry Filling (I made 2 batches to fill all 36 jars)


  • 1/3 cup (3.5 ounces) sugar
  • 1 tablespoon cornstarch
  • pinch ground cinnamon
  • pink salt
  • 6 cups (30 ounces) fresh blueberries, or 36 ounces frozen blueberries
  • 1 1/2 teaspoons lemon zest
  • 1 tablespoon lemon juice
Ingredients for Cobbler Topping (I made 3 batches, as suggested by Megan)
  • 1 cup (5 ounces) all-purpose flour 
  • 2 tablespoons stone-ground cornmeal
  • 1/4 cup (1 3/4 ounces) sugar
  • 2 teaspoons baking powder
  • 1/4 teaspoon baking soda
  • 1/4 teaspoon salt
  • 4 tablespoons (1/2 stick) butter, melted
  • 1/3 cup buttermilk
  • 1/2 teaspoon vanilla extract
  • 1/8 teaspoon ground cinnamon (for sprinkling)
  • 2 teaspoons sugar (for sprinkling)

**FOLLOW MIXING INGREDIENTS ON NOTMARTHA.ORG**
Changes and tips for changing recipe from 8oz. jars to 4 oz. jars below-

 
I filled my itty bitty jars to the bottom line on the jar with the blueberry filling.  

About to here:
I cooked by tiny jars for the same amount of time suggested by the recipe, 25-30 minutes for the blueberries and 15-20 minutes for the topping.  The smaller jar didn't appear to effect the cook time much at all. 


For the topping, I chose to crumble my topping to give it a little more texture.  

These were a HUGE hit at the wedding and I swelled with pride every time I overheard someone say, "oh my god, look how cute, tiny little cobblers!"  

A++, thanks for the idea Megan!!

tags: food in jars, food, how to, notmartha, tutorials, wedding
Thursday 10.13.11
Posted by mandee rae
 

Halloween How-To: Haunted Window

I love decorating for Halloween almost as much as I love Halloween candy.  Every year I'm tempted to make the front of my house look like a creepy haunted house with different scary scenes in every window and a scarecrow on the porch and every year I have to remember that the only person those decorations would scare...would be me.  I can imagine putting a sillouette on my front window, forgetting I did it and then running for my life, every night when I get home.  I'm sure the thought of that would have my Sister, and chief childhood tormentor, rolling on the floor laughing her face off. 

So this year, I decided to make this awesome INDOOR haunted window and you can too!!

To make, you'll need:
  • an old window frame
  • a string of spooky Halloween lights
  • a plastic window cover w/Halloween image
  • hot glue gun
  • scissors
  • duct tape
Step 1: Gather your supplies-

I'm using this old window frame we salvaged (aka took from the neighbor's trash) a couple years ago as the base of my project- 

And this plastic window cover left over from last year's Halloween party (cut in half)-


Step 2: Applying plastic sheeting-

Place your window frame and plastic face down on your work surface-

Heat up your glue gun and place a small line of glue along the inside ledge of the window-
Line your plastic up with the top of the window and press into place either with your fingers or with a tool, the eraser end of a pencil perhaps-

Repeat on all sides.

***CAREFUL!!  GLUE IS HOT!!!***

At this point you may have some extra plastic hangin' over the side, you can either- a) fold it and glue it down like you're wrapping a present or b) just cut it off:

When you turn your project right side up, you should have something that looks like this:

If that is the case, please move on to Step 3.  If not, please return to Step 2. 


Step 3: LIGHTS!-

I'm using a string of purple and orange lights that flicker and mimic fire when lit up, so spooky, if you don't have any you can buy them here or here.

LED lights are a good idea to make sure you don't melt the plastic sheeting and then hate me forever for ruining Halloween.
At this point, having a black cat to check your lights (aka tangle them up) is not necessary but it will add authenticity to your project- mine is probably at her food dish if you'd like to borrow her:
Once again, turn your window face down on your work surface and tape your lights onto the back in whatever pattern works for you, making sure the plug is left out on the bottom. 

I chose an octagon because it was the only way the lights fit properly:

Step 4: Hang it up!

Now the only thing left to do is fill a bowl with eyeballs and dig out your favorite severed hand to create a super spooooooky indoor haunted window display that won't make you run for your life!

Happy Halloween!
         ~mandee rae
tags: custom, halloween, how to, kittehs, tutorials
Tuesday 10.11.11
Posted by mandee rae
 

Welcome Great Pumpkin!

I'll be rushing home from work tonight to watch this and decorate my house for Halloween!
If you haven't seen it you should probably look into it.  It's a classic!
tags: halloween, illustrations, other peoples art, video clip
Monday 10.10.11
Posted by mandee rae
 

From tacos to trick-or-treaters

Move over National Taco Day, there's a new holiday in town...

Halloween is my very favorite holiday!!  (except for all the other ones I get overly excited for also.)  And, the Nightmare Before Christmas is one of my favorite Halloween movies of all time (except for all the other ones I get overly excited for also) so this month my window got the Tim Burton treatment.

 Complete with Lock, Stock and Barrel in their creepy walking bathtub,


 the iconic image of Jack Skellington atop a hillside,

and a delightful jack-o-latern patch.  Hopefully you enjoy it as much as I enjoyed painting it.

 Happy October 9th!  TWENTY TWO DAYS 'TIL HALLOWEEN!!
Do you have your costume all picked out?  Tell me what you're going to be in the comments below!

tags: halloween, nightmare before christmas, other peoples art, tim burton, window paintings
Sunday 10.09.11
Posted by mandee rae
 

We did it! We did it!!

 
                                                                                    painting (c) Scott Murry

Last night was a SMASH success!!!  We packed the Cantina Mexicana to the rafters, sold some art,  killed some tacos and even enjoyed some jalapeno margaritas (Marga-penos?)!  All in all, it was an amazing night!  Thanks to everyone who braved the rain and came out to celebrate our nation's greatest food holiday. 

The tacos will be hanging at the Cantina through Sunday, Oct. 9th.  Go check 'em out!

National Deviled Egg Day is November 2nd....start the countdown!
photo credit BazBiz
UPDATE!: Bazaar Bizarre has some pictures and nice words about the event on their website!  Thanks BazBiz!


tags: ABCowls, art show, bazaar bizarre, craft show, freak outs, national taco day, other peoples art, stick figures, taco tuesday
Wednesday 10.05.11
Posted by mandee rae
 

Taco Magnets


I just added these adorable taco magnets to my shop.
 
Get 'em while they're hot!
green


National Taco Day is only FOUR short days away!  Are you coming to the show?
tags: etsy, illustrations, national taco day, stick figures, taco tuesday
Friday 09.30.11
Posted by mandee rae
 

Wedding Wednesday: Penny Pendants

Amy & I made these adorable penny pendant necklaces as gifts for my bridesmaids.  I found the tutorial on one of my favorite craft blogs:JustSomethingIMade.  You can find the tutorial with great pictures and super easy to follow directions on her site.  Here's the super dumbed-down version:

Cathe says to use decals for the necklaces but as I have not acheived the level of craftyhood she has, I didn't have vintage decals lying around my house.  I do however have a solid collection of old calendars, scrap paper and wrapping paper.  Amy was nice enough to go through my scrap paper (above) and meticulously cut out tiny flowers and adorable designs (thanks Amy!) to put on the necklaces while I drilled holes in the pennies (below). 

We found that the softer the paper was, the easier it adhered to the penny.  Stiff paper tended to stay stiff and wouldn't lay down properly.  Tissue paper worked the best and had a transparent quality that allowed a lot of the penny to show through which I really liked.  After selecting our design, we laid the paper on the penny, covered them with magic powder stuff (Cathe explains all of this in the tutorial) and popped 'em in the oven.  Note- she used a toaster oven, I don't have one of those so I used my oven on a setting of 325 degrees for about 6 minutes.


And when they came out, they were necklaces!

Ok, maybe not exactly but with a couple of O rings and some adorable charms bought on Etsy (where else?) we were all set.  And my bridesmaids loved them! 
Have a great Wednesday!
tags: ABCowls, antiques, custom, how to, other peoples art, tutorials, wedding wednesday
Wednesday 09.28.11
Posted by mandee rae
 

Mini Paper Taco Trucks

These mini paper taco trucks are
 so cute and they're yours for the folding!

Just print out any of these adorable little trucks below...
follow the dotted line, cut them out and fold 'em up.  So rad!
tags: national taco day, other peoples art, paper craft, taco tuesday, tutorials
Monday 09.26.11
Posted by mandee rae
 

Wellness Wednesday


A balanced meal painted for Elizabeth in Somerville, MA.
tags: anthropomorphic, custom, food, stick figures
Wednesday 09.21.11
Posted by mandee rae
 

TWO WEEKS until National Taco Day

I can't believe Taco the Art Show is only 2 weeks away!
                                            flyer by Scott Murry

There will be a free raffle, $1 mini tacos, $5 margaritas and a prize for the finest taco accessory.  

Bring the kids and don't forget to wear your best taco hat!  See you there!
tags: anthropomorphic, food, freak outs, national taco day, other peoples art, signs, taco tuesday
Tuesday 09.20.11
Posted by mandee rae
 

Wedding Wednesday: Mini Harmonica Necklace

About a week before my wedding it dawned on me that I had yet to find gifts for my Ring Bearers.  The horror!  I was explaining this to my friend Bailie, who has no links to her name because she flies far below the radar and only exists in real life, who works at the Screamin' Peach Waxing Studio (get it?  screamin' peach...waxing...oh nevermind) in Fort Collins and, as luck would have it, she sells these ADORABLE little mini harmonica necklaces right there at the check out counter!

They were under $20, super noisy and mini- perfect for my own noisy little mini ring bearers.  And they loved them!!

The Screamin' Peach is located at:
638 S College Ave
Fort Collins, CO 80524
Phone: (970) 224-2930
 
Thanks again times a million Bailie!!


tags: other peoples art, wedding wednesday
Wednesday 09.14.11
Posted by mandee rae
 

Amy Made a Freak Out

OMG!  Amy made a new treasury and it made it to the FRONT PAGE** of Etsy!

**If you're not a Treasury maker or Etsy user this information might not be that special to you.

In that case please use this alternate exclamation:

"OMG! Look at this great Halloween themed treasury Amy made!"
tags: ABCowls, etsy, freak outs, other peoples art, treasury
Wednesday 09.14.11
Posted by mandee rae
 

Taco Tuesday: Taco the Blog

Oh my God! Me too!

Come Celebrate
International National Taco Day of America
THE ART SHOW!!!
(more information)
at
the Cantina la Mexicana
in
Union Square, Somerville, MA
on October 4th @ 6:00pm
(that's in 21 DAYS!!!)

15 Local Somerville Artists highly skilled in the Taco Arts
will be showcasing various forms of taco art including,
but not limited to:
paintings
drawings
photos
some crocheted taco goods
and even a dog named Taco!!
(you heard me)

And if all that's not enough for you,
The Cantina will also be featuring
$1 MINI TACOS
(cue the confetti)
&
a fabulous Margarita special!

Bring the kids, have some dinner, enjoy some art and have a laugh.

See you there!
tags: anthropomorphic, food, national taco day, other peoples art, taco tuesday
Tuesday 09.13.11
Posted by mandee rae
 

The Things We Carried.

I'm almost ashamed to admit that, after living in New England for 10 years, this Saturday was the first time I ever made it to the Brimfield Antique Show.  Please try not to judge me too harshly.

I'm so bummed I never went before because it was awesome beyond my wildest expectations and I came home with a truckload of junk trash priceless treasures! 

Like this awesome miniature tabletop croquet set that we clearly needed for only $20-


An adorable mid-century gold and robin's egg blue lamp with a great honeycomb pattern that is now in need of the most perfect lamp shade ever, $15-


These really cool old iron wall brackets that I plan to use, like everything else in my house, to hang plants from, both for $30-
 

An absolutely dreamy blue vintage radio that still works! $11-

And, my coup de grace- this amazing rug that I found tucked away, by some other shopper no doubt, in the corner of a lady's booth who had a little bit of everything.  It's about 5'x7' and she didn't know much about it except to say that the woman she bought it from had brought it home from her travels in the 60's when she was in the AmeriCorps, $60-
It is my absolute new favorite thing and now makes everything else in the room seem old and boring, of course.  Looks like I'm going to have to re-do the whole room!  Bummer.

If you ever have the chance to go to Brimfield and you never have it's definitely worth the trip.  It's located about an hour and 20 minutes outside of Boston.  The next show is in May 2012 which gives you plenty of time to save your pennies and clear some space for all of the amazing things you never knew you needed but cannot afford to live without. 

xo, -Mandee


tags: antiques, brimfield, craft show, haul, other peoples art
Monday 09.12.11
Posted by mandee rae
 

Abstract Leaves: September Window

For the window in the EU this month I thought completely out of the box as far as my usual style is concerned.  I really wanted to add a touch of Autumn colors up there but didn't want to have to actually paint a tree or a pumpkin or baskets of gords.

The result was Atumnal (I don't think that's a word) without being literal (learned that from Project Run way) and I think I like it.  It's so far removed from astronaut monkeys and singing slugs that it's hard for me to wrap my brain around still.  If nothing else, it's entertaining to the eye and that's the whole point of painting this window. Hopefully everyone at work likes it. 

I'd like to take this time to point out that my window was in no way inspired by the shirt I was wearing at the time....errrrrr. 

Happy Almost Fall!!

tags: abstract, window paintings
Saturday 09.10.11
Posted by mandee rae
 
Newer / Older

Powered by Squarespace.