• Portfolio
  • About
  • Contact
  • Shop
mandee made

hand painted windows, signs & chalkboards

  • Portfolio
  • About
  • Contact
  • Shop

Makeover Monday: The Red Credenza

Makeover Monday (Tuesday Edition):
The Great Credenza Makeover of 2012


Last Thursday, on my daily trip around Craigslist, I found this beautiful 1960's style credenza living in the garage of the nicest seller in the history of Craigslist for $25 bucks! 
The drawers and the sliding doors turned out to be the only real wood on it.  The rest of it, as far as I can tell, is made of cement mixed with whatever the heaviest thing on earth is.  Seriously, this thing weighs a ton.  Luckily my wonderful (and hilarious!) friend Zach was nice enough to throw on some sweat pants and go pick it up with me.  Thanks Zach!  (Sorry you had to wear sweat pants to class.)

We got it in the house as far as the living room where it had to stay because Zach had to go to class (in sweats) and, as I may have mentioned, this thing weighs at least 300lbs (and I can only bench press 275) so I can't move it alone.  Living room it is.  I began to unscrew the legs...there were 7.  Interesting.  

While it was flipped over I realized that the entire thing was 3 separate pieces connected by 2 brackets and the common top.  I unscrewed the brackets and top, had it quickly inspected by Fonzie and the pieces came right apart.  I love it so much as one piece but at 8' long I have nowhere the entire unit would even fit. 
Plus, now that they're separate I can actually move the pieces all by my lonesome.  Holler!
I sanded everything- doors, drawers, legs, etc.
And primed them with Zinsser.  This was my first time using Zinsser and I love it!  It dried really fast and covered everything.
I painted the outer parts of the credenza (here after 1 coat) with Rustoleum 'Gloss Sunrise Red'.  I chose the Rustoleum because I wanted a high shine and I loved this perfect color red.  The inside was painted flat 'Olivewood' grey.


Now for the doors.  I decided not to prime the doors, just sand them mostly because I didn't want to tape around that little metal handle bit.  Also cause I just didn't think they needed it. 
I put the doors in the credenza where they'll eventually live and traced the line where they overlap.
Next I laid my doors on the amazing decorative paper I'm using to cover them and cut around their outline using an X-acto knife.  Using the line we drew on the second door I allowed for a little bit of overlap so that the image would appear as one piece when the doors are closed. 
Once you're happy with your paper placement Mod Podge it into place.  Cover the entire surface with Mod Podge, lay your paper down and smooth out any air bubbles.  Be sure to work quick, this stuff dries fast.  When it's in place, cover the entire surface with Mod Podge.  (It's a good idea to use M.P. Hard Coat for this project.)
At first the glue will be cloudy but never fear, it will dry to a beautifully clear finish in no time.  I chose a matte finish and also decided to cover the second set of doors with a 2nd paper option because I just couldn't pick one.

I put the top back on, screwed on the legs and slid the doors in and the results are a sophisticated yet playful piece of furniture that I absolutely adore.  I cannot wait to fill it with carp...I mean crap. 

***TIP from my Mom***
Instead of wasting time cleaning paintbrushes that you're just going to use again for the second coat, wrap them in plastic wrap or a grocery bag and pop 'em in the freezer until you're ready for the next coat of paint.  This way you only have to wash your brushes once at the end of the project which will help seriously reduce the desire to just abandon the project halfway through because washing paint rollers is such a gigantic paint in the a**.  Thanks Lady!
tags: antiques, before and after, custom, diy, freak outs, home decor, how to, paper craft, trash to treasure, tutorials, why dont you make me, wood
Tuesday 03.20.12
Posted by mandee rae
 

25 Cent Word!: Anthropomorphic

I learned a new word- anthropomorphic - suggesting human characteristics for animals or inanimate things, please be prepared for me to throw it around all the time now.  I feel like I just found out about jeans or something.  Like the entire world new there was a word for creepy smilinging vegetalbes, little girls with apple heads and hot dogs with faces happily grilling themselves except me.  It wasn't until I was using every single adjective in my vocabulary AND both hands trying to describe "those creepy teapots with faces...from the 50's...shaped like apples...you know?" that my sister-in-law said, "you mean like an anthropomorphic teapot?" 

Gah!  There's a word for that???  Amazing.

Now would be a great time to check out my brand new Anthropomorphic Label!

tags: animals, anthropomorphic, antiques, art show, etsy, freak outs, illustrations, kittehs, other peoples art, paper craft, stick figures, tchotchke, treasury
Tuesday 01.03.12
Posted by mandee rae
 

Gold Leafing A Vintage Frame

I tried my hand at gold leafing last night for the first time ever and I loved it.  It took this already beautiful- but dull- vintage ornate frame bought at Brimfield this past August and gave it a drag queen makeover. 
It's so shiney!  And now so is my floor and my coffee table and my Mama Cat because she was "helping" me.  Seriously, this stuff gets EVERYWHERE.  It's probably best to do it in a work room (don't have one) or a garage (don't have one of those either) or to go outside (brrrrrrr, no way!)  Livingroom it is!

It's worth it though 'cause look how pretty:


I gave the original mat that came with the frame a mini makeover too. 
It's pretty simple:
  1. Cover entire surface of mat with gluestick
  2. Lay decorative paper face down on flat surface
  3. Lay mat, glue side down, on top of decorative paper
  4. Smooth out any ridges/bubbles
  5. Trim along edges with X-acto knife
  6. Bob's your uncle.

 I can't show you the finished product because it's part of a birthday present.  Pictures to follow.
Have you ever gold leafed?  Got any tips for me?  I'd love to hear them!
tags: antiques, before and after, custom, glitter, gold leaf, how to, make me, picture frame, tutorials, why dont you make me, wood
Friday 12.30.11
Posted by mandee rae
 

Green Eyed Inspiration

Recently my friend Mike (who doesn't get a last name because he's internet shy) came over to my house (wearing his tinfoil hat) and was all drooly and "holy crap I want that!" over my awesome card catalog that I told you about earlier this year.  And I don't blame him, the thing is radical.  

He later told me that he was "so inspired" (read: wicked jealous) that he when he got home he immediatly went on Ebay to find one for himself.  And then, when he couldn't find one (in your face Mike!) he settled on this  beautiful set of vintage Post Office Boxes instead (oh wait, in my face!)  
(like this one is available here)

Then, because he doesn't waste all of his freetime re-pinning and tweeting, he built a case and a stand for it making his officially better than mine.  (I hope you're happy Mike.)
Now he just has to figure out what could possibly be worthy of being stored in these little boxes.  Mail is too obvious and besides, he would never have enough.  I guess he could put his weed in there but that would sure be a lot of reefer. 
Oh, I know!  He can use it to keep his anti-internet, conspiracy theory zines in order (first alphabetically and then numerically) and away from the prying eyes of the gum'ment.  Perfect!


(<3 you Mike!)
tags: antiques, card catalog, custom, other peoples art, wood
Thursday 12.29.11
Posted by mandee rae
 

Wedding Wednesday: Tchotchke Centerpiece/Favors


...and with a little less than 5 hours left of this beautiful, rainy Wednesday I bring you:
 
                                                                                                              Picture by Kristen Mallory
WEDDING WEDNESDAY: 
TCHOTCHKE EDITION! 

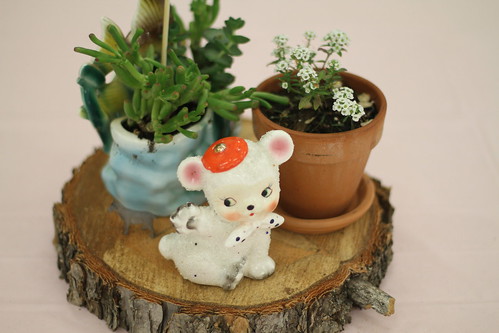
For a full year before my wedding I collected tchotchkes from junk shops, second hand stores, garage sales and of course, Etsy to create my combination centerpiece/favors. 
There were a couple of rules for collecting these hollow treasures, they needed to be:
a. planters
b. under $7 (american currency) and
c. a little "off"....not exactly ugly, just "off".
To make them into centerpieces was truly a family affair.  We (my 4 year old flowergirl, Sister and I) planted succulents in all of the tchotchkes, put them on wooden disks (cut especially for me by my loving Father), accompanied them with precious little terra cotta pots filled with small white flowers (put together by Lady, my Mom) added hand stamped signs (Made by Liz) that said, "take me home tonight!" and then they were all artfully arranged on each table by my BFF, Gina Marie.
Pictures by Meredith Mascola
The results were 100% unique, semi home-made, adorable little bits of precious that I could hardly stand to give away!!  These were SUCH a huge hit I was blown away!  People were hiding them from each other and stealing them off tables all night.  I personally saw the squirrel change hands at least 3 times, I'm still hearing stories about who the rightful owner should be.  And now the fun part is finding out where all of them went.  I love going to friend's houses and seeing which planter everyone ended up with (aka who swiped what while no-one else was looking!) 
  
tags: Liz, antiques, custom, dogs, etsy, faux bois, kittehs, kristen, make me, paper craft, signs, tchotchke, the noop, wedding wednesday, wedding
Wednesday 10.19.11
Posted by mandee rae
 

Wedding Wednesday: Penny Pendants

Amy & I made these adorable penny pendant necklaces as gifts for my bridesmaids.  I found the tutorial on one of my favorite craft blogs:JustSomethingIMade.  You can find the tutorial with great pictures and super easy to follow directions on her site.  Here's the super dumbed-down version:

Cathe says to use decals for the necklaces but as I have not acheived the level of craftyhood she has, I didn't have vintage decals lying around my house.  I do however have a solid collection of old calendars, scrap paper and wrapping paper.  Amy was nice enough to go through my scrap paper (above) and meticulously cut out tiny flowers and adorable designs (thanks Amy!) to put on the necklaces while I drilled holes in the pennies (below). 

We found that the softer the paper was, the easier it adhered to the penny.  Stiff paper tended to stay stiff and wouldn't lay down properly.  Tissue paper worked the best and had a transparent quality that allowed a lot of the penny to show through which I really liked.  After selecting our design, we laid the paper on the penny, covered them with magic powder stuff (Cathe explains all of this in the tutorial) and popped 'em in the oven.  Note- she used a toaster oven, I don't have one of those so I used my oven on a setting of 325 degrees for about 6 minutes.


And when they came out, they were necklaces!

Ok, maybe not exactly but with a couple of O rings and some adorable charms bought on Etsy (where else?) we were all set.  And my bridesmaids loved them! 
Have a great Wednesday!
tags: ABCowls, antiques, custom, how to, other peoples art, tutorials, wedding wednesday
Wednesday 09.28.11
Posted by mandee rae
 

The Things We Carried.

I'm almost ashamed to admit that, after living in New England for 10 years, this Saturday was the first time I ever made it to the Brimfield Antique Show.  Please try not to judge me too harshly.

I'm so bummed I never went before because it was awesome beyond my wildest expectations and I came home with a truckload of junk trash priceless treasures! 

Like this awesome miniature tabletop croquet set that we clearly needed for only $20-


An adorable mid-century gold and robin's egg blue lamp with a great honeycomb pattern that is now in need of the most perfect lamp shade ever, $15-


These really cool old iron wall brackets that I plan to use, like everything else in my house, to hang plants from, both for $30-
 

An absolutely dreamy blue vintage radio that still works! $11-

And, my coup de grace- this amazing rug that I found tucked away, by some other shopper no doubt, in the corner of a lady's booth who had a little bit of everything.  It's about 5'x7' and she didn't know much about it except to say that the woman she bought it from had brought it home from her travels in the 60's when she was in the AmeriCorps, $60-
It is my absolute new favorite thing and now makes everything else in the room seem old and boring, of course.  Looks like I'm going to have to re-do the whole room!  Bummer.

If you ever have the chance to go to Brimfield and you never have it's definitely worth the trip.  It's located about an hour and 20 minutes outside of Boston.  The next show is in May 2012 which gives you plenty of time to save your pennies and clear some space for all of the amazing things you never knew you needed but cannot afford to live without. 

xo, -Mandee


tags: antiques, brimfield, craft show, haul, other peoples art
Monday 09.12.11
Posted by mandee rae
 

Card Catalogin'

One day I said to my librarian Mother-in-Law,
"I've always wanted one of those old card catalogs libraries used to use."  

To which she replied, "Really?  
We couldn't pay peopleto take those things a couple of years ago.  
I bet we still have a couple in the basement of the library."


And that's how I got my very own card catalog.  HOLLER!!


tags: antiques, brimfield, card catalog, freak outs, wood
Tuesday 03.15.11
Posted by mandee rae
 

Powered by Squarespace.