• Portfolio
  • About
  • Contact
  • Shop
mandee made

hand painted windows, signs & chalkboards

  • Portfolio
  • About
  • Contact
  • Shop

I joined a sorority!

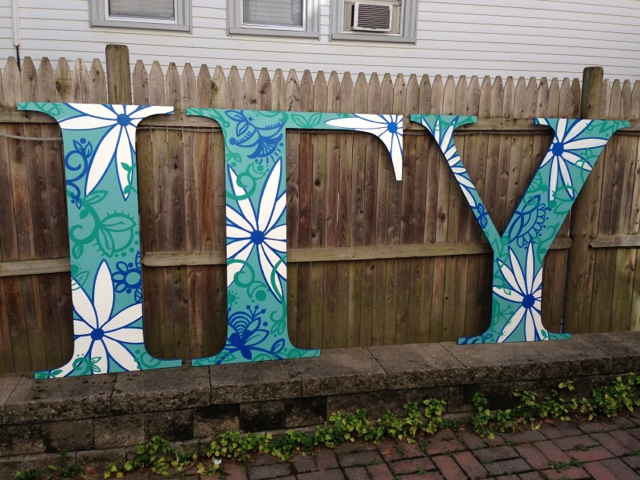
Ok, maybe I didn't actually join a sorority BUT I did paint some FOUR FOOT TALL lawn letters for one!  The super nice ladies of Ioma Gamma Upsilon at U-Mass Amherst contacted me to customize their new letters and I couldn't wait.  It's probably the most unique (read: weirdest) request I've had to date so I was obviously all about it.
  
Ioma Gamma Upsilon's colors are ultramarine & green and they wanted an all-over floral print on the letters.  I created a custom light teal color for the background and then did a simple white, blue & green design over the entire surface.   I also sealed the letters with a matte clear coat so that they wouldn't have a glare during photo shoots but would be resistant to beer-bong mishaps.  (Or is that just in fraternities?  ...Either way.)    

Now, before you tell me how great my all-over design is, because I can tell you're dying to...I have a confession...this is actually my best-friend Liz's design.  It's what happens when she's distracted and doodling.  These awesome little flowers and swirls just pour out of her pen...and then I snatch them up and make them life size on huge letters.  That's what friends are for, right??  Thanks Liz!!


Sadie's all ready to pledge.  Get this girl a paddle!
tags: Liz, custom, girls room, greek letters, home decor, in the garden, lettering, signs, sorority, wood
Tuesday 09.17.13
Posted by mandee rae
 

Geometrical Block Printed Planter Makeover

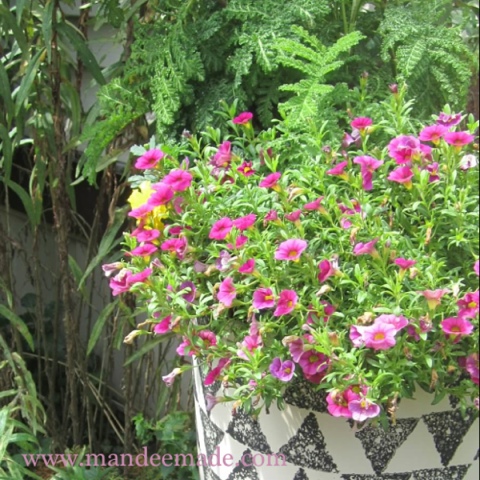
I made this beautiful block printed planter first thing this planting season and then forgot to share it.  This essentially means it never happened at all and all of my priming and painting and sponge cutting was for not.  So I'm posting it now, just in time for the end of planting season.  Luckily, I think it's going to look just as lovely stuffed full of Mums and tall grasses as it looked chock full of petunias.  

And the best part of this project?  It  was completely free!


It was super easy (and free!) and would make a great weekend project.  
It took me about 4 hours start-to-finish including the time it took the paint to dry.  

Here's how I made it...for FREE!  (Did I mention this project didn't cost me anything?)

  1. I took an old banged up pot that wasn't being used and gave it a good scrubbin'.
  2. Then I sprayed the inside of the pot red with some paint I had on-hand; spray the inside first because there may be some over-spray
  3. Then I primed the outside of the pot white and covered the over-spray
  4. After that I gave the whole thing a coat of Cream colored paint and let it dry.
Cost so far: $0.00

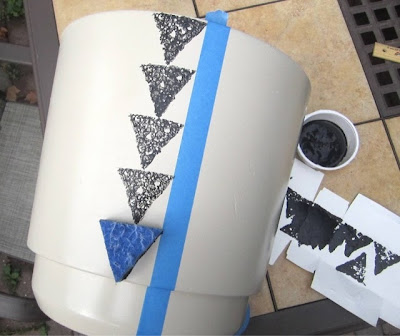
While the paint was drying I made the stamp.


  1. To make the stamp you'll need an old sponge, scissors, a Sharpie & a ruler
  2. I used the ruler to measure out a 2" x 2" x 2" triangle
  3. and drew it on the sponge with my marker
  4. Then I cut along the lines and now I have my stamp...and it's still FREEEEE!
Now you should test your stamp to experiment with how much paint to use, 
how hard to press down on it and to decide on the pattern you're going to use. 


I used a piece of blue painter's tape to create a line to follow while I stamped.  
This helped a little bit but it would be ok without it also.  

I continued to stamp all the way around the planter, 
moving my piece of tape to the next row as the paint dried.


Then I removed the tape and I had a perfectly printed, perfectly d.i.y.'d, 
perfectly FREE brand spankin' new planter!  And, I can't remember if
I told you this or not yet but it didn't cost me a thing!!  


Rit Rooooo!!  (that's a whistle noise)


I'd love to see your pictures if you decide to make one of your own. 

Thanks for stopping by.  Have a wonderful weekend!  
tags: before and after, home decor, how to, in the garden, make me, recycled, trash to treasure, tutorials, why dont you make me
Friday 08.23.13
Posted by mandee rae
 

Custom Artwork with a Paisley Print

 These paisley paintings were done for a little lady's room inspired by the lampshade her Mom bought  at PBK from the Tera Paisley Collection.

All of the designs mimic the style of the fabric but are completely original to match the overall color-scheme of bright pinks, purples, greens and blues in her room.

Because there is no discernible top or bottom, left or right, they can be hung in any order and any direction.  They can be hung separately, one on each wall, in a row, in a grid, in a circle, on the ceiling...whatever her little heart desires.  

This one kind of looks like some sort of weird amoeba.  I'm ok with that. 

Contact me if you'd like some custom paintings for your own little one.  Thanks for stopping by!
tags: canvas painting, custom, girls room, home decor, in the garden, nursery decor, nursery paintings
Saturday 07.13.13
Posted by mandee rae
 

Sophie's Safari


24"x36" wall size custom canvas painting for Sophie.


Including her name, date-of-birth and her favorite little Caterpillar.


I'm always accepting commissions for custom artwork and quotes are always free.


CONTACT ME if you have any questions or want a painting of your own!
tags: Safari, animals, anthropomorphic, birds, canvas painting, custom, giraffes, girls room, home decor, lettering, monkeys, name plate, nursery paintings
Tuesday 04.09.13
Posted by mandee rae
 

You've Been Framed: Personalized Frames for Kids


Picture frames have proven to be hands-down my biggest seller on Etsy and in real life.  They're a quick, inexpensive, personalized gift that is perfect for kid's birthdays, Christmas and -as in the 4th picture- as party favors.  Contact me to have your own painted or order one on my Etsy page.  

tags: boys room, custom, dinosaur, etsy, home decor, lettering, name frame, name plate
Thursday 10.04.12
Posted by mandee rae
 

$5 DIY Googley-eyed Fall Wreath Tutorial


I'm not sure what's happening to me but I felt an overwhelming urge to make an Autumn wreath this year.  I've always been into decorating, and over-decorating, for the holidays but I usually keep it to giant fake spiders, severed hands and glittery skeletons.  Your standard October stuff.  So when I found myself shopping for a wreath making supplies, nobody was more surprised than me.  It was as if I blacked out and woke up at the register with a wreath form and fake foliage in my hands. 

So, I've accepted it, I like wreaths.  There, I said it.  

But that doesn't mean I have to make a button covered, gingham scarecrow country crafts with a giant bow type of wreath.   I can like wreaths and still make them look like me.  It doesn't mean I have to buy high waisted Mom jeans or run out and lease a mini-van.  Not yet anyway.  

So here is my tutorial on how to make a quick $5 Googley-Eyed Fall Wreath:

SUPPLIES (I got the $1 supplies from the dollar store)
$1 wreath form
$1 fall foliage x3
$1 5pk mini squashes
ball of twine (had on hand)
googley eyes (had on hand) 
wire cutters (had 'em)
glue gun/glue sticks (had 'em)

To begin, start by tying the end of your twine to your wreath form and wrap the twine around the wreath for a space about 3" long.  This is purely decorative. 
Next, arrange your 3 bouquets of fall foliage and begin snipping them off of the main branch with your wire cutters.  Arrange the new seperate pieces so that you have 2 equal bouquets (if you plan on making 2 wreaths...which I did because I have a double front door.)
Now begin adding the plastic foliage to your wreath just under the 3" band of twine.  I used hot glue to keep the plants in place and then wrapped more twine around the base of each one- mostly because it looks cute but also to secure it in place.  

When you reach the end add another 3" section of wrapped twine to finish it off.  You can stop here and have a perfectly lovely Autumnal Wreath to hang on your front door but I feel like it's just too regular.  It needs something. 
In my case, that "something" almost always ends up being googley-eyes.  Or "guurely eyes" as my niece calls them.  

From the 5 pack of mini squashes I scooped at the dollar store, I grabbed a couple of 'em and gave them life.  I am not unlike the good Dr. Frankenstein in this way.  


Take your freshly googelied squashes and arrange them at the base of your fallin' foliage until you are satisfied and hot glue them into place.  
**Note: my squashes are made of styrofoam which means they basically melt when the come in contact with hot glue.  Turn your glue gun to the lowest setting if you have that option or put the glue on the wreath first and allow it to cool for about 3-4 seconds before placing your squash so that it doesn't turn into a puddle.**
And finally, add a twine hanger to the top of your wreath and hang with pride from your front door(s).  


Together these wreaths cost me less than $10 and they can be left up through Halloween and all the way through to Thanksgiving.  I hope you like them as much as I do. 
happy fall!

tags: anthropomorphic, diy, food, halloween, holidays, home decor, how to, kids crafts, make me, pumkins, pumpkins, thanksgiving, tutorials, why dont you make me
Sunday 09.30.12
Posted by mandee rae
 

Giving in to Trends: Ombre Paint Chip Art

I spent a good portion of my teenage years rejecting all things trendy and popular.  That habit has stuck with me now into my late 20's (ok, early 30's) whenever I see something adorable on another craft blog and/or everybody's favorite website, Pinterest.  (See, I'm even trying to pretend like I don't totally love Pinterest.)  Instead of happily jumping on the bandwagon and admitting that something is adorable, I dog ear it and come back later, trying not to make eye contact with it and acting like it's not so great. 

Today I decided that it was time for me to make eye contact with paint chip art and I'm glad I did because it was a fun and easy project (not to mention practically free!) that only took about an hour to finish.  

Here's how I did it:

First, go to your favorite paint store and grab some paint chip samples from the big wall of colors (or use different colored construction paper).  I actually felt a little bad about taking so many so I asked the guy behind the counter if it was ok.  He shrugged with complete indifference and I was guilt-free.  

Next, find a small circular object to outline onto the paint chips to utilize as much of the colored area as possible- I used a small roll of tape- and cut out your circles.

Experiment with the layout of your circles until you have 'em just how you want 'em.

Prepare your frame- I got this white matted frame for $5.99 at the Christmas Tree Shop by my house- the frame has some dings in it but I'm writing them off as "shabby chic."

Remove the mat and backing from the frame and outline the opening of the mat directly onto the cardboard backing.

Now, starting and the bottom and beginning with the lightest layer, glue the circles to the cardboard using a glue stick.  The second layer should overlap the first slightly and the circles should become progressively darker towards the top of the cardboard.

You only have to fill in the area inside of the outline we made but be sure to overlap the edges so that none of the backing shows.  

To add a letter, take another paint chip in a coordinating color and draw your letter backwards on the BACKSIDE of it.    

Cut out the letter, glue it into place wherever your little heart desires and presto- you're an artist.


I decided to let some of the lettering from the names of the paint show on my final product.  It gives it extra home-made-i-ness.  


Now you have a personalized gift to give as a new baby or shower present and no-one has to know about the ridiculous internal struggle that it took to make it.   

Happy Friday!


tags: girls room, home decor, how to, kids crafts, lettering, make me, picture frame, trash to treasure, tutorials, why dont you make me
Friday 06.08.12
Posted by mandee rae
 

Tufa Pots by Jennifer!

My very talented friend and gardener, Jennifer McCabe, recently started a blog (follow her here) and just announced that she'll be selling her handmade Hypertufa Pots at Scrub Oak in Nantucket starting June 10th.


Hypertufa pots are lightweight pots made of a cement & peat moss mixture.  They're durable like cement, lightweight like a regular pot and make beautiful additions to gardens, porches or table displays.  Jennifer's Tufa pots are all one of a kind, shaped by hand and cured to withstand the elements.   You can also learn to make your own tufa pots from Jennifer herself during workshops she's leading at the Nantucket Garden Festival, July 25th & 26th.  Contact Jennifer for more information or to sign up for a class.

tags: home decor, in the garden, other peoples art, why dont you make me
Thursday 05.31.12
Posted by mandee rae
 

Why don't you make me?: Three-Tiered Terra Cotta Planter


With limited space in my small city yard every inch counts so each Spring I am faced with a decision: do I want pretty flowers or a functioning vegetable garden?  I envision myself having friends over for dinner and quickly running outside with my schears to an adorable, and lovingly attended to, little vegetable garden- I'd grab fresh herbs for the potatoes, pluck some peppers and lettuce for the salad and maybe bring in some grape tomatoes for my friends to snack on before dinner.  They just love that.  Then, after dinner we'd all get in my spaceship and go visit Unitron, the home of the last living unicorn.  In other words, it's not going to happen.

What did happen however is this- a triple-decker half veggie/half flower tower of compromise.  I'm taking baby steps to becoming the world's best hostess by growing only the greens to my future salads and I still have room for flowers! 

Here's how I did it:

First, I invited Liz over who did everything.  (This was an important step because Liz is wicked good at this stuff and because I have a cast on my right arm up to my elbow right now.) 

Next, we took pots from the pot graveyard on the side of my house and selected 3 in decending sizes.  (These don't have to match perfectly, as you can see.)


Pick a sunny spot in your garden to place the biggest pot- we nestled ours right into this Vinca Minor- and fill with soil until just below the top.


Add a small dowel or bamboo rod into the largest pot and thread themiddle pot onto it burying the pot about an inch into the soil of the largest pot.

Then trim the dowel until about 3-4" is showing to be inserted into the smallest pot.

Now have Liz thread the smallest pot right over the dowel and press into the dirt on the lower level burying it slightly.  Great job Liz!

And finally, you are ready to plant your Garden of Compromise.  Liz and I decided on some green lettuce, purple lettuce, white & purple flowers, 2 small cascading plants and topped the whole thing off with a ponytail fern.
Now we truly can have our garden...and eat it too.

Thanks Liz!! <3 <3 <3
tags: Liz, diy, home decor, how to, in the garden, make me, recycled, trash to treasure, tutorials, vegetarian, why dont you make me
Friday 04.27.12
Posted by mandee rae
 

Makeover Monday: The Red Credenza

Makeover Monday (Tuesday Edition):
The Great Credenza Makeover of 2012


Last Thursday, on my daily trip around Craigslist, I found this beautiful 1960's style credenza living in the garage of the nicest seller in the history of Craigslist for $25 bucks! 
The drawers and the sliding doors turned out to be the only real wood on it.  The rest of it, as far as I can tell, is made of cement mixed with whatever the heaviest thing on earth is.  Seriously, this thing weighs a ton.  Luckily my wonderful (and hilarious!) friend Zach was nice enough to throw on some sweat pants and go pick it up with me.  Thanks Zach!  (Sorry you had to wear sweat pants to class.)

We got it in the house as far as the living room where it had to stay because Zach had to go to class (in sweats) and, as I may have mentioned, this thing weighs at least 300lbs (and I can only bench press 275) so I can't move it alone.  Living room it is.  I began to unscrew the legs...there were 7.  Interesting.  

While it was flipped over I realized that the entire thing was 3 separate pieces connected by 2 brackets and the common top.  I unscrewed the brackets and top, had it quickly inspected by Fonzie and the pieces came right apart.  I love it so much as one piece but at 8' long I have nowhere the entire unit would even fit. 
Plus, now that they're separate I can actually move the pieces all by my lonesome.  Holler!
I sanded everything- doors, drawers, legs, etc.
And primed them with Zinsser.  This was my first time using Zinsser and I love it!  It dried really fast and covered everything.
I painted the outer parts of the credenza (here after 1 coat) with Rustoleum 'Gloss Sunrise Red'.  I chose the Rustoleum because I wanted a high shine and I loved this perfect color red.  The inside was painted flat 'Olivewood' grey.


Now for the doors.  I decided not to prime the doors, just sand them mostly because I didn't want to tape around that little metal handle bit.  Also cause I just didn't think they needed it. 
I put the doors in the credenza where they'll eventually live and traced the line where they overlap.
Next I laid my doors on the amazing decorative paper I'm using to cover them and cut around their outline using an X-acto knife.  Using the line we drew on the second door I allowed for a little bit of overlap so that the image would appear as one piece when the doors are closed. 
Once you're happy with your paper placement Mod Podge it into place.  Cover the entire surface with Mod Podge, lay your paper down and smooth out any air bubbles.  Be sure to work quick, this stuff dries fast.  When it's in place, cover the entire surface with Mod Podge.  (It's a good idea to use M.P. Hard Coat for this project.)
At first the glue will be cloudy but never fear, it will dry to a beautifully clear finish in no time.  I chose a matte finish and also decided to cover the second set of doors with a 2nd paper option because I just couldn't pick one.

I put the top back on, screwed on the legs and slid the doors in and the results are a sophisticated yet playful piece of furniture that I absolutely adore.  I cannot wait to fill it with carp...I mean crap. 

***TIP from my Mom***
Instead of wasting time cleaning paintbrushes that you're just going to use again for the second coat, wrap them in plastic wrap or a grocery bag and pop 'em in the freezer until you're ready for the next coat of paint.  This way you only have to wash your brushes once at the end of the project which will help seriously reduce the desire to just abandon the project halfway through because washing paint rollers is such a gigantic paint in the a**.  Thanks Lady!
tags: antiques, before and after, custom, diy, freak outs, home decor, how to, paper craft, trash to treasure, tutorials, why dont you make me, wood
Tuesday 03.20.12
Posted by mandee rae
 

Make Me: Upcycled Wrapping Paper Covered Light Switch


Due to a lackluster showing this winter from the Snow Gods my Spring Fever has kicked in earlier than normal this year.  The fact that the sun is shining and there is no snow on the ground makes me want to sweep the porch, get out the plastic flamingos and fill every pot I own with flowers.  Problem is, even though the sun is technically shining, it's still only about 40 degrees outside.  Brrr.  That's a little cold for flowers.  So, while I wait for the weather to warm up outside, I decided to bring my Spring Fever inside this weekend and make this green leaf  upcycled wrapping paper covered light switch.

For this project you will need:
  • a light switch cover
  • matte mod podge
  • a paintbrush
  • some leftover wrapping paper and/or tissue paper
  • the cutest miniature screwdriver I ever saw
To start, pick a light switch cover that needs a pick-me-up.  
Look at this guy, he's completely let himself go.  
Remove it from the wall with a tiny little screwdriver that is so cute!   
A-hem, or just use a regular screwdriver.  Wash the cover to get rid of oily fingerprints and dust.


Lay your cover on top of your chosen paper- I chose this wrapping paper that I've been hoarding saving for the perfect project since rescuing it from a present I received a couple years ago.  
Cut around the cover leaving about 1/4"extra on all sides. 

Wrapping paper works very well for this project because it is soft and bendable but remains sturdy even when wet with glue.  Card stock is too stiff for this project and tissue paper can be difficult as it tears easily.

Cover the entire surface of the light plate with Mod Podge and lay the paper over the top, paint a layer of Mod Podge on the surface of the paper as well, smoothing out any air bubbles as you go.  
Once dry, about 20 minutes, flip the cover face down on your surface, cut the corners with an X-acto knife and glue the paper around the corners like you're wrapping a present.  
Add Mod Podge to both sides of the paper to make it pliable and secure the paper to the light plate.  


Cut an 'X' into the backside of the paper where the light switch goes (this is much easier if the paper is completely dry if it is still wet, wait for it to dry or you may rip the paper), add Mod Podge to both sides of the 'X'd paper and glue down. 
Allow to dry, about 15-20 minutes, if desired add another coat of Mod Podge to the entire front of the light switch to ensure it's fully sealed and you're done.  


Grab your adorable little screw driver and put him back on the wall.  
                                                       
Muuuuch better.


Now there's nothing left to do but sit back and wait for Spring.  Only four days until Daylight Savings-  We're almost there!!
tags: before and after, custom, home decor, how to, make me, trash to treasure, tutorials, why dont you make me
Wednesday 03.07.12
Posted by mandee rae
 

Before & After: the Painting Process

Makeover shows, be them human or residential, are a major weakness of mine.  Mostly because I love a good before-and-after picture.  I love seeing a neglected little kitchen in Iowa that hasn't been updated since Reagan was in office be turned into a gormet cookery fit for the White House.  It's so satisfying to see the design come to life and the before-and-after shot at the end is what makes it all come together.


The same is true for paintings.  Whenever I'm asked to do a custom painting I always start with a sketch to make sure the customer and I are on the same page.  Once the drawing is approved, I get 'er painted up and no many how many times I go through the process I still love seeing the before and after shot at the end.    

For instance, you can go from hand-colored sketch to nice looking piece of art (if I do say so myself):

From an idea in a notebook to a wall-sized triptych that is now the highlight of Lil' Dillon's room.  


From a basic scribble to a full-blown stadium.


From outline to outstanding....ya, I just said that.  

Click HERE to see more before-and-afters.  

And feel free to email me if you have an idea for a painting...or if you just want to talk about muffins. 

tags: animals, art show, before and after, boys room, canvas painting, crab, craft show, crazy cat lady, custom, etsy, fenway, home decor, kittehs, murals, under da sea
Tuesday 02.28.12
Posted by mandee rae
 

Easy Stool Makeover: Before and After


Stool: $4 at a garage sale
Can of spray paint: $3.95
Time: 10 minutes to sand/spray, 1 hour to dry
Result: adorable new red plant stand


To keep the natural character of this stool I chose to only lightly sand the varnish off before painting it.  This way, all of the wear-and-tear and naturally acquired flaws still show through after painting and you're left with an adorable stool that looks like it's  always been red.    

Total cost: under $8.  Not bad.  


**TIP** If you want to make this project extra easy, set the stool and the spray paint outside and tell Liz you'll do it in a minute.  She can't resist!


tags: Liz, before and after, diy, home decor, how to, trash to treasure, tutorials, wood
Sunday 02.12.12
Posted by mandee rae
 

Powered by Squarespace.