• Portfolio
  • About
  • Contact
  • Shop
mandee made

hand painted windows, signs & chalkboards

  • Portfolio
  • About
  • Contact
  • Shop

Chalk dirty to me...

*Full disclosure, it took 16 tries to get the sun exactly
 right in this picture but it was toooootally worth it. 

In case you're thinking of having a weatherproof chalkboard painted by me, here is how the process works:
  • Step 1: Email me & give me a rough idea of what you want
  • Step 2: I will give you a horrible sketch of what I intend to paint for you
  • Step 3: Trust the process, the actual painting always looks better than the sketch.
  • Step 4: Enjoy your beautiful new waterproof chalkboard!!
                                                                        Final vs. Rough Draft


You look great today!
tags: Handpaintedsign, before and after, chalkboard, custom, dogs, hand lettering, wood
Tuesday 01.05.16
Posted by mandee rae
 

It's beginning to look a lot like Christmas...CRAFTING!

It snowed the other morning.

For me that means it's Christmas time.

So even though it only snowed for 3 minutes and it was mixed with rain and none of it stuck to the ground...it still snowed. And now it's Christmas time!!!

More specifically, it's Christmas CRAFTING time!!  Here are some of my favorite Christmas crafts from years past to keep you busy while I stretch out my glitter coating, wreath making, snowflake cutting muscles. It's important to ease into these things lest you pull something and have to sit out the rest of the season.


           D.I.Y. FIREPLACE         UGLY CHRISTMAS SWEATER

UPCYCLED CATALOG CHRISTMAS TREE


KID-FRIENDLY DIY SNOWGLOBES


I'd love to see any projects you make following my tutorials or any projects you've made on your own!  

Merry Christmas Crafting season!!
tags: before and after, christmas craft, custom, glitter, holidays, hot glue, how to, kids christmas crafts, kids crafts, make me, paper craft, trash to treasure, why dont you make me
Friday 11.15.13
Posted by mandee rae
 

Geometrical Block Printed Planter Makeover

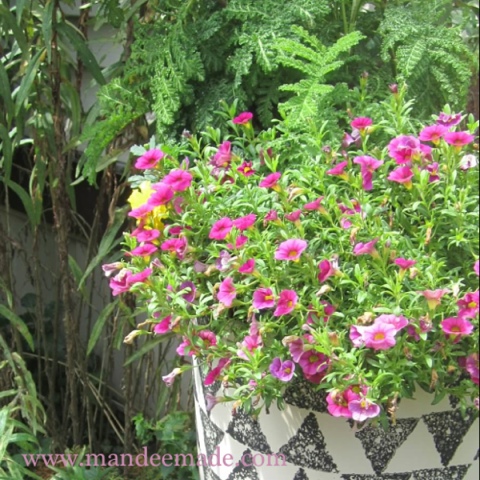
I made this beautiful block printed planter first thing this planting season and then forgot to share it.  This essentially means it never happened at all and all of my priming and painting and sponge cutting was for not.  So I'm posting it now, just in time for the end of planting season.  Luckily, I think it's going to look just as lovely stuffed full of Mums and tall grasses as it looked chock full of petunias.  

And the best part of this project?  It  was completely free!


It was super easy (and free!) and would make a great weekend project.  
It took me about 4 hours start-to-finish including the time it took the paint to dry.  

Here's how I made it...for FREE!  (Did I mention this project didn't cost me anything?)

  1. I took an old banged up pot that wasn't being used and gave it a good scrubbin'.
  2. Then I sprayed the inside of the pot red with some paint I had on-hand; spray the inside first because there may be some over-spray
  3. Then I primed the outside of the pot white and covered the over-spray
  4. After that I gave the whole thing a coat of Cream colored paint and let it dry.
Cost so far: $0.00

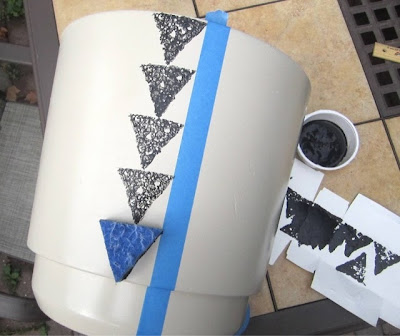
While the paint was drying I made the stamp.


  1. To make the stamp you'll need an old sponge, scissors, a Sharpie & a ruler
  2. I used the ruler to measure out a 2" x 2" x 2" triangle
  3. and drew it on the sponge with my marker
  4. Then I cut along the lines and now I have my stamp...and it's still FREEEEE!
Now you should test your stamp to experiment with how much paint to use, 
how hard to press down on it and to decide on the pattern you're going to use. 


I used a piece of blue painter's tape to create a line to follow while I stamped.  
This helped a little bit but it would be ok without it also.  

I continued to stamp all the way around the planter, 
moving my piece of tape to the next row as the paint dried.


Then I removed the tape and I had a perfectly printed, perfectly d.i.y.'d, 
perfectly FREE brand spankin' new planter!  And, I can't remember if
I told you this or not yet but it didn't cost me a thing!!  


Rit Rooooo!!  (that's a whistle noise)


I'd love to see your pictures if you decide to make one of your own. 

Thanks for stopping by.  Have a wonderful weekend!  
tags: before and after, home decor, how to, in the garden, make me, recycled, trash to treasure, tutorials, why dont you make me
Friday 08.23.13
Posted by mandee rae
 

Dresser Makeover: Recreating a $799 dresser for $42

Recently I was approached to recreate a beautiful dresser with a staggering price tag.  The Collage Dresser retails for $799 and I'm sure it's well worth it- the dresser is lovely- but "in this economy" (aka the catch phrase of the 21st century) who can really afford it?  The recipient also wanted a decidedly less "shabby chic" version of the dresser with no distressing or faux wear on the paper.

To make this dresser I started out with my basic supplies.  My client already had an old cheap dresser in her house so we saved money on having to buy one though you can always find cheap dressers on Craigslist if you were looking to do this project.   Cost of project: $0.00


I also had some semi-gloss, oil-based white paint left over from another project and used that to paint the dresser.  It's a good idea to use a gloss or semi-gloss on dressers so that you can wipe them down if necessary.  I did 3 coats of the white with a roller.  So far the cost of this project is still $0.00.  Excellent.

I ordered some vintage wallpaper on Etsy from 2 shops, Vintage Sheet Addict and Threads & Memories, I spent about $16 at each shop and the paper is awesome.  There were so many cool designs it was really hard to decide which ones made the cut.  Cost of project now: $32.


I laid the paper out on the drawers and experimented with placement until it looked right. 

One drawer in particular gave me a considerable amount of trouble.   I got it right on the 3rd attempt. 

I glued the wallpaper in place using Tacky Glue and then smoothed it out using a brayer.  (You can find them both at Michael's, AC Moore, Blick, etc.)  This worked better than Modge Podge because since this is vintage wallpaper that's been rolled up for God knows how long- it didn't lay as well as regular paper would and the corners kept curling up on me.  Because the Tacky Glue is true to it's name and "tacky", it was easier to make the edges stick to the drawer.   


Then I spent $10 on some basic black knobs from the Target General Super Store and my dresser was complete.  Bringing my grand total to $42 and some change.  Not bad considering this project was done as a trade- I got to spend a week at my client's house on Cape Cod in exchange for creating this dresser for her.  I think I got the better end of this bargain.

Thanks for coming by!  I hope you liked my project.  If you did, let me know in the comments below and don't forget to go "like" me on Facebook.   (I told my Mom I was popular...I don't want to disappoint her.)

tags: before and after, custom, furniture, makeover, paper craft, recycled, trash to treasure, tutorials, why dont you make me, wood
Friday 07.12.13
Posted by mandee rae
 

Elf on the Shelf: Gender Reassignment Surgery

For as long as he can remember, Jingle Bop knew he was different.  While all the other elf boys were out playing reindeer games, little Jingle was in his Mom's closet trying on her best Christmas Eve frocks.   While the other little elves were saving their elf allowance to buy their first sleighs, Jingle was saving his for a sewing machine.  Well, it's all payed off because now Jingle Bop is the #1 Elfinware Designer in the whole North Pole and he's just released his Holiday 2012 Collection exclusively on our site!
 Below we have a sweet red felt skirt with snowflake details and a lovely white waistband that, as you can see by the look on his face, Jingle is particularly proud of


and here Jingle is modeling a white felt mini with holly berry and jingle bell details.


We're proud of you for being yourself Jingle.  You look fabulous- boy or girl!!
tags: before and after, christmas craft, custom, glitter, holidays, kids crafts
Friday 11.30.12
Posted by mandee rae
 

A little more bacon-y, please.


 I feel like I've come to a good place in life when people know to come to me if they need something to look "more bacon-y".  That was the request for this inexpensive bacon costume bought online by Karen- it just didn't look bacon-y enough so she asked me to fix it.
And it's a good thing because Maya and her pet sheep would have looked ridiculous in that store-bought bacon costume in the annual 4-H costume parade at the Marshfield Fair.  That was a close one!

p.s. please note Maya's custom bacon bow...I think there's a Lady Gaga costume in her future.
tags: animals, before and after, custom, food, halloween, kids crafts
Monday 09.03.12
Posted by mandee rae
 

Dog Days of Summer Window Painting

Welp, it's here again, the dog days of Summer are upon us.  Those long hot (and in New England HUMID) days towards the end of Summer characterized by frizzy hair, sweaty buns and bad attitudes.  When people start longing for Fall and the cool nights she brings. 

There are a couple things you can do about this type of weather:  you can complain incessantly about how hot it is, much to the chagrin of your co-workers, I'm sure or you can do like this guy and shamelessly hog up the kiddie pool. 
***  ***  ***  ***

This window painting is a remake of a June 2010 window painting I did- reduce, reuse, recycle! 


Enjoy the rest of your Summer!!
tags: animals, before and after, dogs, window paintings
Thursday 08.09.12
Posted by mandee rae
 

Holme's Farm Mobile Farm Stand

Long time no talk, huh?  If you've wondered where I've been for most of June, the short answer is Manomet.  The long answer is that I've been spending every free moment I have down in Manomet, MA (just South of Plymouth) transforming this gigantic white trailer into a mobile barn (complete with a cow, pig and full vegetable garden) for the wonderful women of Holmes Farm's brand new mobile farm stand.  
This monsterous trailer needed to be sanded, primed, painted, resanded, repainted, drawn on, painted on and sealed all by hand and all during a particularly rainy June while all-the-while being parked outside in the elements. It was definitely a labor of love and I couldn't have done it without the help I got from Jeremy, Liz and Jennifer.  Thank you guys so much!!


 There are 2 ways to see the trailer in action- you can either go directly to Holmes Farm on Saturdays and support their farm stand or catch them at the Plymouth Farmer's Market every Thursday at Plymouth Plantation.  

I can't believe I'm (almost) done!  I'm as happy as a pig in...uh, mud.

tags: Liz, animals, before and after, birds, commercial project, custom, farm stand, in the garden, lettering, logo, murals, pumpkins, vegetarian
Monday 07.02.12
Posted by mandee rae
 

Safari Painting for Baby Ryan

This huge 36" x 24" painting was done for Ryan whose Mom wanted a bright, colorful, happy Safari scene.  Ryan's walls are painted a neutral color so the sides of this painting were done in alternating dark and light green stripes to really make it stand off the wall.  The happy characters are intentionally kept very simple to keep the painting from being overwhelming to baby.  
Ryan's date-of-birth was snuck into the painting on a leaf in the zebra's mouth and Ryan's loving Mother is represented by the giraffe who's giving her son's name a good snuggle.  


From rough sketch to final product:

 This painting was designed to grow with Baby Ryan- being young enough to be appropriate for a nursery and also bright enough to be able to transition easily into a toddler's room.  Email me if you'd like a painting made for your little one or if you have questions about price, sizing or anything else.  All questions are welcome.   


tags: before and after, boys room, canvas painting, custom, girls room, lettering, murals, name plate, nursery paintings
Wednesday 05.02.12
Posted by mandee rae
 

POW! ZAP! BOOM! Super Hero Shoes!!

I made these custom kicks for my super hero loving 5-year-old niece, Tabitha, who is in a two man band with her Dad that she aptly named 'Tabitha and the X-Men.'  Wolverine is second only to Daddy in her life, she even calls people (including her Mom) "Bub", just like Wolverine, he's her absolute favorite.  Her other great love in life is Wonder Woman, she is a little girl after all. 

She always looks for shoes with her favorite characters but "those shoes are for BOYS, Aunt Mandee"- that's where I come in.   
Sister bought these white canvas mary janes at Target.  They're perfect, just-girly-enough, simple and easy to draw on.  I decorated them using a combination of paint markers and acrylic paint.  The drawings are comletely water proof- they won't run, drip or fade. 
And now Tabitha has her own custom, Wolverine & Wonder Woman girly super hero shoes.   What more could a girl ask for?

Do you have your own hard to shop for tot that needs some custom kicks?  Email me and let's see what we can come up with. 

tags: before and after, custom, kids crafts, super hero, tabitha, tutorials
Tuesday 05.01.12
Posted by mandee rae
 

Makeover Monday: The Red Credenza

Makeover Monday (Tuesday Edition):
The Great Credenza Makeover of 2012


Last Thursday, on my daily trip around Craigslist, I found this beautiful 1960's style credenza living in the garage of the nicest seller in the history of Craigslist for $25 bucks! 
The drawers and the sliding doors turned out to be the only real wood on it.  The rest of it, as far as I can tell, is made of cement mixed with whatever the heaviest thing on earth is.  Seriously, this thing weighs a ton.  Luckily my wonderful (and hilarious!) friend Zach was nice enough to throw on some sweat pants and go pick it up with me.  Thanks Zach!  (Sorry you had to wear sweat pants to class.)

We got it in the house as far as the living room where it had to stay because Zach had to go to class (in sweats) and, as I may have mentioned, this thing weighs at least 300lbs (and I can only bench press 275) so I can't move it alone.  Living room it is.  I began to unscrew the legs...there were 7.  Interesting.  

While it was flipped over I realized that the entire thing was 3 separate pieces connected by 2 brackets and the common top.  I unscrewed the brackets and top, had it quickly inspected by Fonzie and the pieces came right apart.  I love it so much as one piece but at 8' long I have nowhere the entire unit would even fit. 
Plus, now that they're separate I can actually move the pieces all by my lonesome.  Holler!
I sanded everything- doors, drawers, legs, etc.
And primed them with Zinsser.  This was my first time using Zinsser and I love it!  It dried really fast and covered everything.
I painted the outer parts of the credenza (here after 1 coat) with Rustoleum 'Gloss Sunrise Red'.  I chose the Rustoleum because I wanted a high shine and I loved this perfect color red.  The inside was painted flat 'Olivewood' grey.


Now for the doors.  I decided not to prime the doors, just sand them mostly because I didn't want to tape around that little metal handle bit.  Also cause I just didn't think they needed it. 
I put the doors in the credenza where they'll eventually live and traced the line where they overlap.
Next I laid my doors on the amazing decorative paper I'm using to cover them and cut around their outline using an X-acto knife.  Using the line we drew on the second door I allowed for a little bit of overlap so that the image would appear as one piece when the doors are closed. 
Once you're happy with your paper placement Mod Podge it into place.  Cover the entire surface with Mod Podge, lay your paper down and smooth out any air bubbles.  Be sure to work quick, this stuff dries fast.  When it's in place, cover the entire surface with Mod Podge.  (It's a good idea to use M.P. Hard Coat for this project.)
At first the glue will be cloudy but never fear, it will dry to a beautifully clear finish in no time.  I chose a matte finish and also decided to cover the second set of doors with a 2nd paper option because I just couldn't pick one.

I put the top back on, screwed on the legs and slid the doors in and the results are a sophisticated yet playful piece of furniture that I absolutely adore.  I cannot wait to fill it with carp...I mean crap. 

***TIP from my Mom***
Instead of wasting time cleaning paintbrushes that you're just going to use again for the second coat, wrap them in plastic wrap or a grocery bag and pop 'em in the freezer until you're ready for the next coat of paint.  This way you only have to wash your brushes once at the end of the project which will help seriously reduce the desire to just abandon the project halfway through because washing paint rollers is such a gigantic paint in the a**.  Thanks Lady!

tags: antiques, before and after, custom, diy, freak outs, home decor, how to, paper craft, trash to treasure, tutorials, why dont you make me, wood
Tuesday 03.20.12
Posted by mandee rae
 

QUICK & EASY St. Patrick's Day Centerpiece

Here's a quick & easy idea for a festive St. Patrick's Day or Spring Centerpiece that you can make for under $10!


To make this you'll need:

  • 3- 1/2 pint mason jars (lids not necessary)
  • a small tray (optional)
  • matte white spray paint or white primer
  • a handful of 1" rocks
  • 1 clover plant
  • potting soil


Remove lids from mason jars and put on a paintable surface, mouth-side down. 
 Spray entire outside of jar with paint, it will probably need between 2-3 coats.
 Do the same to the tray, my tray needed 2 coats of paint, it has 1 coat in the picture.  (Tray was $3.99 at craft store)
Add 6-9 rocks per jar, enough to fill about 1/4 of the jar.  This is to create a place for the water to drain from the soil.  Add 2" of potting soil.
Separate clover into 3 sections and add 1 section to each jar, press firmly around base to secure plant into the jar.  Arrange the jars on the tray and you've now made a beautiful, fast & easy St. Patrick's Day centerpiece!  This would also look adorable with herbs, small flowers or succulents.  
 May the road rise to meet you, may you never be burned by your glue gun and until we meet again, may all your crafts be prosperous!


tags: before and after, holidays, tutorials, why dont you make me
Saturday 03.17.12
Posted by mandee rae
 

Make Me: Upcycled Wrapping Paper Covered Light Switch


Due to a lackluster showing this winter from the Snow Gods my Spring Fever has kicked in earlier than normal this year.  The fact that the sun is shining and there is no snow on the ground makes me want to sweep the porch, get out the plastic flamingos and fill every pot I own with flowers.  Problem is, even though the sun is technically shining, it's still only about 40 degrees outside.  Brrr.  That's a little cold for flowers.  So, while I wait for the weather to warm up outside, I decided to bring my Spring Fever inside this weekend and make this green leaf  upcycled wrapping paper covered light switch.

For this project you will need:
  • a light switch cover
  • matte mod podge
  • a paintbrush
  • some leftover wrapping paper and/or tissue paper
  • the cutest miniature screwdriver I ever saw
To start, pick a light switch cover that needs a pick-me-up.  
Look at this guy, he's completely let himself go.  
Remove it from the wall with a tiny little screwdriver that is so cute!   
A-hem, or just use a regular screwdriver.  Wash the cover to get rid of oily fingerprints and dust.


Lay your cover on top of your chosen paper- I chose this wrapping paper that I've been hoarding saving for the perfect project since rescuing it from a present I received a couple years ago.  
Cut around the cover leaving about 1/4"extra on all sides. 

Wrapping paper works very well for this project because it is soft and bendable but remains sturdy even when wet with glue.  Card stock is too stiff for this project and tissue paper can be difficult as it tears easily.

Cover the entire surface of the light plate with Mod Podge and lay the paper over the top, paint a layer of Mod Podge on the surface of the paper as well, smoothing out any air bubbles as you go.  
Once dry, about 20 minutes, flip the cover face down on your surface, cut the corners with an X-acto knife and glue the paper around the corners like you're wrapping a present.  
Add Mod Podge to both sides of the paper to make it pliable and secure the paper to the light plate.  


Cut an 'X' into the backside of the paper where the light switch goes (this is much easier if the paper is completely dry if it is still wet, wait for it to dry or you may rip the paper), add Mod Podge to both sides of the 'X'd paper and glue down. 
Allow to dry, about 15-20 minutes, if desired add another coat of Mod Podge to the entire front of the light switch to ensure it's fully sealed and you're done.  


Grab your adorable little screw driver and put him back on the wall.  
                                                       
Muuuuch better.


Now there's nothing left to do but sit back and wait for Spring.  Only four days until Daylight Savings-  We're almost there!!
tags: before and after, custom, home decor, how to, make me, trash to treasure, tutorials, why dont you make me
Wednesday 03.07.12
Posted by mandee rae
 

Before & After: the Painting Process

Makeover shows, be them human or residential, are a major weakness of mine.  Mostly because I love a good before-and-after picture.  I love seeing a neglected little kitchen in Iowa that hasn't been updated since Reagan was in office be turned into a gormet cookery fit for the White House.  It's so satisfying to see the design come to life and the before-and-after shot at the end is what makes it all come together.


The same is true for paintings.  Whenever I'm asked to do a custom painting I always start with a sketch to make sure the customer and I are on the same page.  Once the drawing is approved, I get 'er painted up and no many how many times I go through the process I still love seeing the before and after shot at the end.    

For instance, you can go from hand-colored sketch to nice looking piece of art (if I do say so myself):

From an idea in a notebook to a wall-sized triptych that is now the highlight of Lil' Dillon's room.  


From a basic scribble to a full-blown stadium.


From outline to outstanding....ya, I just said that.  

Click HERE to see more before-and-afters.  

And feel free to email me if you have an idea for a painting...or if you just want to talk about muffins. 

tags: animals, art show, before and after, boys room, canvas painting, crab, craft show, crazy cat lady, custom, etsy, fenway, home decor, kittehs, murals, under da sea
Tuesday 02.28.12
Posted by mandee rae
 

Easy Stool Makeover: Before and After


Stool: $4 at a garage sale
Can of spray paint: $3.95
Time: 10 minutes to sand/spray, 1 hour to dry
Result: adorable new red plant stand


To keep the natural character of this stool I chose to only lightly sand the varnish off before painting it.  This way, all of the wear-and-tear and naturally acquired flaws still show through after painting and you're left with an adorable stool that looks like it's  always been red.    

Total cost: under $8.  Not bad.  


**TIP** If you want to make this project extra easy, set the stool and the spray paint outside and tell Liz you'll do it in a minute.  She can't resist!


tags: Liz, before and after, diy, home decor, how to, trash to treasure, tutorials, wood
Sunday 02.12.12
Posted by mandee rae
 

Gold Leafing A Vintage Frame

I tried my hand at gold leafing last night for the first time ever and I loved it.  It took this already beautiful- but dull- vintage ornate frame bought at Brimfield this past August and gave it a drag queen makeover. 
It's so shiney!  And now so is my floor and my coffee table and my Mama Cat because she was "helping" me.  Seriously, this stuff gets EVERYWHERE.  It's probably best to do it in a work room (don't have one) or a garage (don't have one of those either) or to go outside (brrrrrrr, no way!)  Livingroom it is!

It's worth it though 'cause look how pretty:


I gave the original mat that came with the frame a mini makeover too. 
It's pretty simple:
  1. Cover entire surface of mat with gluestick
  2. Lay decorative paper face down on flat surface
  3. Lay mat, glue side down, on top of decorative paper
  4. Smooth out any ridges/bubbles
  5. Trim along edges with X-acto knife
  6. Bob's your uncle.

 I can't show you the finished product because it's part of a birthday present.  Pictures to follow.
Have you ever gold leafed?  Got any tips for me?  I'd love to hear them!
tags: antiques, before and after, custom, glitter, gold leaf, how to, make me, picture frame, tutorials, why dont you make me, wood
Friday 12.30.11
Posted by mandee rae
 

Powered by Squarespace.