• Portfolio
  • About
  • Contact
  • Shop
mandee made

hand painted windows, signs & chalkboards

  • Portfolio
  • About
  • Contact
  • Shop

I joined a sorority!

Ok, maybe I didn't actually join a sorority BUT I did paint some FOUR FOOT TALL lawn letters for one!  The super nice ladies of Ioma Gamma Upsilon at U-Mass Amherst contacted me to customize their new letters and I couldn't wait.  It's probably the most unique (read: weirdest) request I've had to date so I was obviously all about it.
  
Ioma Gamma Upsilon's colors are ultramarine & green and they wanted an all-over floral print on the letters.  I created a custom light teal color for the background and then did a simple white, blue & green design over the entire surface.   I also sealed the letters with a matte clear coat so that they wouldn't have a glare during photo shoots but would be resistant to beer-bong mishaps.  (Or is that just in fraternities?  ...Either way.)    

Now, before you tell me how great my all-over design is, because I can tell you're dying to...I have a confession...this is actually my best-friend Liz's design.  It's what happens when she's distracted and doodling.  These awesome little flowers and swirls just pour out of her pen...and then I snatch them up and make them life size on huge letters.  That's what friends are for, right??  Thanks Liz!!


Sadie's all ready to pledge.  Get this girl a paddle!
tags: Liz, custom, girls room, greek letters, home decor, in the garden, lettering, signs, sorority, wood
Tuesday 09.17.13
Posted by mandee rae
 

Liz's AMAZING Half-Jewish Ugly Christmas Sweater!

What do you do when you're both half-Jewish and you're invited to your friend's ugly Christmas sweater party?
Well, if you're Liz, you go halfsies on a sweater with your best Dude and make an incredible half-Hannukah/half-Christmas sweater that is so amazing that you just can't help but stare at it and keep saying, "oh my God, it's a full menorah when you're side-by-side!  I can't believe it!"   Well played Rosenberg, well played.

Happy Hannukah/Christmas everyone!
tags: Liz, christmas craft, diy, freak outs, other peoples art
Monday 12.17.12
Posted by mandee rae
 

Holme's Farm Mobile Farm Stand

Long time no talk, huh?  If you've wondered where I've been for most of June, the short answer is Manomet.  The long answer is that I've been spending every free moment I have down in Manomet, MA (just South of Plymouth) transforming this gigantic white trailer into a mobile barn (complete with a cow, pig and full vegetable garden) for the wonderful women of Holmes Farm's brand new mobile farm stand.  
This monsterous trailer needed to be sanded, primed, painted, resanded, repainted, drawn on, painted on and sealed all by hand and all during a particularly rainy June while all-the-while being parked outside in the elements. It was definitely a labor of love and I couldn't have done it without the help I got from Jeremy, Liz and Jennifer.  Thank you guys so much!!


 There are 2 ways to see the trailer in action- you can either go directly to Holmes Farm on Saturdays and support their farm stand or catch them at the Plymouth Farmer's Market every Thursday at Plymouth Plantation.  

I can't believe I'm (almost) done!  I'm as happy as a pig in...uh, mud.

tags: Liz, animals, before and after, birds, commercial project, custom, farm stand, in the garden, lettering, logo, murals, pumpkins, vegetarian
Monday 07.02.12
Posted by mandee rae
 

Riverdog Doggy Daycare: Window Painting


Liz and I painted the window over at Riverdog Doggy Daycare in Union Square last week.
  
Below is what the window looked like before....wahhhh-wahhhhh.  
(That's the sound of something sad and lackluster.)  

We did a big Bernese Mountain Dog and dozens of little pink flowers to celebrate the arrival of Spring.  

And we also had to pay homage to Riverdog's River-Cat, Dennis, the friendliest cat I've ever met and the shop's unofficial mascot.  Dennis alone is reason enough to stop by the shop for a visit. 


Go check it out if you're in the neighborhood and tell 'em Mandee sent you!
tags: Liz, animals, crazy cat lady, dogs, kittehs, window paintings
Monday 05.14.12
Posted by mandee rae
 

Why don't you make me?: Three-Tiered Terra Cotta Planter


With limited space in my small city yard every inch counts so each Spring I am faced with a decision: do I want pretty flowers or a functioning vegetable garden?  I envision myself having friends over for dinner and quickly running outside with my schears to an adorable, and lovingly attended to, little vegetable garden- I'd grab fresh herbs for the potatoes, pluck some peppers and lettuce for the salad and maybe bring in some grape tomatoes for my friends to snack on before dinner.  They just love that.  Then, after dinner we'd all get in my spaceship and go visit Unitron, the home of the last living unicorn.  In other words, it's not going to happen.

What did happen however is this- a triple-decker half veggie/half flower tower of compromise.  I'm taking baby steps to becoming the world's best hostess by growing only the greens to my future salads and I still have room for flowers! 

Here's how I did it:

First, I invited Liz over who did everything.  (This was an important step because Liz is wicked good at this stuff and because I have a cast on my right arm up to my elbow right now.) 

Next, we took pots from the pot graveyard on the side of my house and selected 3 in decending sizes.  (These don't have to match perfectly, as you can see.)


Pick a sunny spot in your garden to place the biggest pot- we nestled ours right into this Vinca Minor- and fill with soil until just below the top.


Add a small dowel or bamboo rod into the largest pot and thread themiddle pot onto it burying the pot about an inch into the soil of the largest pot.

Then trim the dowel until about 3-4" is showing to be inserted into the smallest pot.

Now have Liz thread the smallest pot right over the dowel and press into the dirt on the lower level burying it slightly.  Great job Liz!

And finally, you are ready to plant your Garden of Compromise.  Liz and I decided on some green lettuce, purple lettuce, white & purple flowers, 2 small cascading plants and topped the whole thing off with a ponytail fern.
Now we truly can have our garden...and eat it too.

Thanks Liz!! <3 <3 <3
tags: Liz, diy, home decor, how to, in the garden, make me, recycled, trash to treasure, tutorials, vegetarian, why dont you make me
Friday 04.27.12
Posted by mandee rae
 

Day 6: Meatless Monday


According to MeatlessMonday.com:
 
"Ghent, Belgium became the first city to go meatless in May, 2009 and Paul McCartney introduced Meat-Free Mondays to the UK soon after. Since then, Meatless Monday has rapidly expanded into an international movement! The campaign’s simple message allows each nation to bring its unique culture, customs and cuisine to the table. Join the movement. It's good for your nation's health, good for the planet!"

And here are 6 reasons why you should join in and go 
Meatless on Mondays:
  • LIMIT CANCER RISK
  • REDUCE HEART DISEASE
  • FIGHT DIABETES
  • CURB OBESITY
  • IMPROVE YOUR DIET
  • REDUCE YOUR CARBON FOOTPRINT
Not to mention that there are a millieu of delicious vegetarian dishes out there to try, like this one that Liz made for me last week that was so so so delicious I can't even stand it:
Country Fried Seitan 
For more recipes, information and to pledge to go Meatless on Mondays, go to MeatlessMonday.com now!
tags: 10 ways in 10 days, Liz, food, recipe, recycled
Monday 04.16.12
Posted by mandee rae
 

Day 10: The Pledge

Earth Day 2012 is Sunday, April 22nd- that's 10 days away.  

For the next 10 days I challenge you to do one act a day to help clean up the earth and lessen our environmental footprint on it.  


Day 10: Go to EarthDay.org and pledge an Act of Green.  I pledged to quit using plastic utensils.  Plastic utensils  are super convenient and I fully admit that I'm guilty of using them but did you know that according to the EPA only 8% of plastic is actually recycled in America?  For the sake of argument let's say that I use one 3-piece set of plastic cutlery a day.  That's 3 pieces of hard to recycle plastic (fork, knife, spoon) per workday, per year....the average person works about 261 days a year...that's 783 pieces of throw-away cutlery!!   And that's just accounting for what I use AT WORK...what about weekends, while traveling, picniks, etc.  Woah.


My solution:   The obvious choice is to use metal cutlery whenever possible but I work 40 hours a week with a 2-hour round-trip commute which means, I'm not home a lot so- I bought this:
It's totally a spork.  My very best Liz has had one that she carries around in her purse with her everywhere and I always see her use it but never really thought much of it until now.  She eats all of her at-work meals with it and then washes it and puts it back in her bag.  Genius!  So now I'm jumping on the Liz-Wagon, using my spork and encouraging others to do the same.  We're saving the earth...one plastic fork at a time.

What are you going to pledge?

tags: 10 ways in 10 days, Liz, earth day, holidays, kids crafts, recycled
Thursday 04.12.12
Posted by mandee rae
 

Easy Stool Makeover: Before and After


Stool: $4 at a garage sale
Can of spray paint: $3.95
Time: 10 minutes to sand/spray, 1 hour to dry
Result: adorable new red plant stand


To keep the natural character of this stool I chose to only lightly sand the varnish off before painting it.  This way, all of the wear-and-tear and naturally acquired flaws still show through after painting and you're left with an adorable stool that looks like it's  always been red.    

Total cost: under $8.  Not bad.  


**TIP** If you want to make this project extra easy, set the stool and the spray paint outside and tell Liz you'll do it in a minute.  She can't resist!


tags: Liz, before and after, diy, home decor, how to, trash to treasure, tutorials, wood
Sunday 02.12.12
Posted by mandee rae
 

Heart Shaped Love: A Valentine Marshmallow Tutorial

What better way to tell your little ones you love them this Valentine's Day than with these homemade heart-shaped marshmallows?  Making marshmallows from scratch was way less difficult than I thought it was going to be.  They can easily be prepared in under 30 minutes.  

Step 1 To make marshmallows go over to Elizabeth LaBau's wonderful about.com marshmallow photo tutorial and follow the steps on Pages 1-6.  Then, for Step 7 come back and see me.  (Trust me, this is going to be much easier than trying to follow my directions.)

Step 7 Pour half of your marshmallow mixture onto half of your prepared baking sheet (we didn't use tinfoil cause we're rule breakers) and spread using a rubber spatula.

Step 8 Put a few drops of pink food coloring into the remaining half of the mixture and stir until it is a uniform pink.


Step 9 Pour the remaining mixture onto the other half of the sheet and spread out using a spatula.
OPTIONAL
Step 10 Coat marshmallow mixture with sprinkles!
Step 11 The recipe calls for the marshmallows to "sit out for several hours or overnight to fully set up."  However, because we are horribly impatient and wanted to eat marshmallows NOW we just set ours outside in the snow for about a half an hour and they were fine. 

Step 12 Using heart shaped cookie cutters (metal ones with sharp edges work best) begin cutting out your heart shapes. 
                                                                   hand modeling by Liz.


                                                                 hand modeling by Liv.
Repeat until there are no more hearts to be cut out and you're left with a delicous pile of marshmallow remnants. 


Step 13 Make some hot chocolate, plop in a couple of marshmallows and make somebody's day!

tags: Liz, food, how to, kids crafts, make me, tutorials, valentines day, why dont you make me
Friday 01.27.12
Posted by mandee rae
 

Thank You for your Outrage.

 
When I'm mad I'm not looking for sympathy, I don't need the sage advice of an elder and I certainly don't want to hear the voice of reason.
 
What I need is for my friends to be outraged at the incredible injustice that I've had to face. I need them to fly off the handle if I've had to wait too long to get coffee. I want a table flipped if my boss wouldn't give me the day off. I want promises of hell fire any time I've been even the tiniest bit inconvenienced.  This is how I will know you're my friend.
 
And then I want to say thank you. Thank you for your outrage.
 
4x4" alternating grey on grey striped speech bubble painting with hot orange outline available on my "other" Etsy shop.
tags: Liz, canvas painting, etsy, lettering, quote bubbles, the compliment shoppe
Thursday 11.17.11
Posted by mandee rae
 

National Pumpkin Cheesecake Day!


This is truly a cause for celebration, National Pumpkin Cheesecake Day?  Yes please!

To celebrate, Liz and I made this deliciously simple pumpkin cheesecake last night.  
I let it sit over night in the fridge to set up


...and then, because you should always test your work, I had a piece for breakfast (it's like a pastry, what?) and I'm happy to report it was delicious!!


Here is the recipe we used.  Happy baking and happy National Pumpkin Cheesecake Day! 

**Please celebrate responsibly.** 


tags: Liz, anthropomorphic, food, national food holidays
Friday 10.21.11
Posted by mandee rae
 

Wedding Wednesday: Tchotchke Centerpiece/Favors


...and with a little less than 5 hours left of this beautiful, rainy Wednesday I bring you:
 
                                                                                                              Picture by Kristen Mallory
WEDDING WEDNESDAY: 
TCHOTCHKE EDITION! 

For a full year before my wedding I collected tchotchkes from junk shops, second hand stores, garage sales and of course, Etsy to create my combination centerpiece/favors. 
There were a couple of rules for collecting these hollow treasures, they needed to be:
a. planters
b. under $7 (american currency) and
c. a little "off"....not exactly ugly, just "off".
To make them into centerpieces was truly a family affair.  We (my 4 year old flowergirl, Sister and I) planted succulents in all of the tchotchkes, put them on wooden disks (cut especially for me by my loving Father), accompanied them with precious little terra cotta pots filled with small white flowers (put together by Lady, my Mom) added hand stamped signs (Made by Liz) that said, "take me home tonight!" and then they were all artfully arranged on each table by my BFF, Gina Marie.
Pictures by Meredith Mascola
The results were 100% unique, semi home-made, adorable little bits of precious that I could hardly stand to give away!!  These were SUCH a huge hit I was blown away!  People were hiding them from each other and stealing them off tables all night.  I personally saw the squirrel change hands at least 3 times, I'm still hearing stories about who the rightful owner should be.  And now the fun part is finding out where all of them went.  I love going to friend's houses and seeing which planter everyone ended up with (aka who swiped what while no-one else was looking!) 
  
tags: Liz, antiques, custom, dogs, etsy, faux bois, kittehs, kristen, make me, paper craft, signs, tchotchke, the noop, wedding wednesday, wedding
Wednesday 10.19.11
Posted by mandee rae
 

Wedding Wednesday: Ruffle Curtain Tutorial


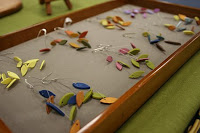
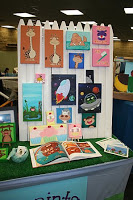
Pictures by Meredith Mascola (c)2011. 
As I have eluded to many times in the past, I got married this past May.  It was a magical DIY-filled day months in the making and I was maniacal about documenting every silly little project to someday share with you, the people of the internet.  Well, it seems that day is today...

Welcome to my first ever Wedding Wednesday Tutorial!

My plan is to feature a wedding themed project and tutorial from my very own wedding every Wednesday until I either, A) run out of projects or B) just kinda forget.  The first project I'm going to feature is a ruffle curtain made from recycled (aka old) sheets, curtains, tablecloths and pillowcases that hung behind CakeTown (above) during my reception.  I got so many compliments on it I thought I'd tell you all how I made it. 

Below (left) is the inspiration for this ruffle curtain- an adorable shower curtain from, where else, Anthroplogie.  It was so so cute and so so expensive but mostly, it was so so pink.  The picture on the Right is what I made  instead.  The entire cost of this project was about $20.  The total cost for the Anthropologie curtain was $250.  I think I've made my case.  

"How-to" after the jump...

For this project you'll need the following supplies:

-Different colors, prints, patterns and textures of similar colored fabric
-A base piece of fabric (I used an old curtain)
-a few different trims- fringe, dingle balls, etc.
-sewing machine
-thread
-scissors
-hot glue (I put this on every list whether you need it or not)
-measuring tape

This is the fabric I'm using below.  I, well, Liz and I, went to a couple Goodwills to find the perfect mix of beiges, whites, textured materials and dingle balls!  The ruffles should coordinate and be cohesive but not match.  Matching is boring.  All together, this fabric cost me about $12.


I also found this 42"x84" vintage (read: old) curtain that I'll use as my base to add my ruffles to.  It was $3.99 from the textile bin at the Goodwill in Davis Square.


Next, I made a mark on the fabric at the height I felt each ruffle should be.  That height happened to be exactly 11".  So, I measured and cut/ripped 11" strips of fabric from each of my sheets.


After I had all of my strips cut, I laid them out on top of the base and experimented with a couple different layouts.  The most important part of the curtain was going to be right at eye level since that is what would show up in pictures of the cake cutting so I made sure to add extra details in that area.  I used a beautiful old lace tablecloth ($2.99) right at the 5' mark and put one of my rows of dingle balls right underneath that. 


When I was satisfied with the layout, I sewed each layer on to the base layer using my sewing machine.  The great thing about this project is that nothing needs to be, or should be for that matter, perfect.  That helped make the sewing part a lot easier. 

At the end I attached some thick twine with my hot glue gun to both of the top corners for the curtain to hang from and Viola!  It's done!  Here it is below being modeled by my front stoop. 

And below, in action at the wedding.  Let me know if you're going to attempt this project or if you've made one of your own like it. I'd love to see it. 
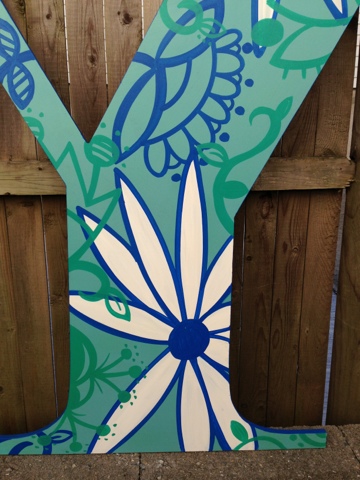
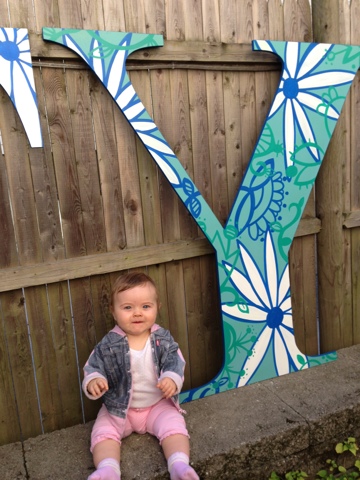
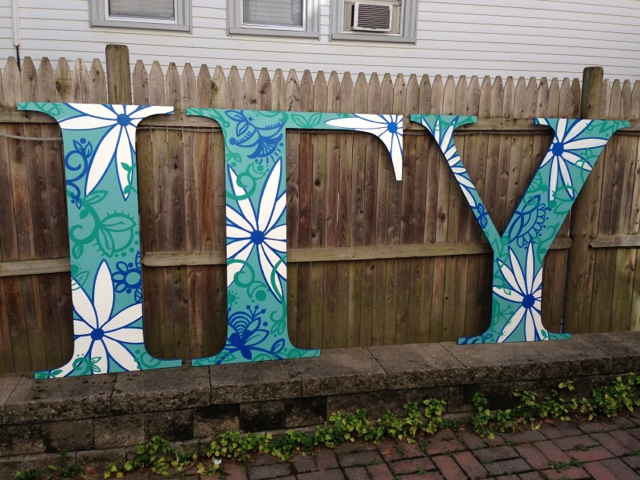
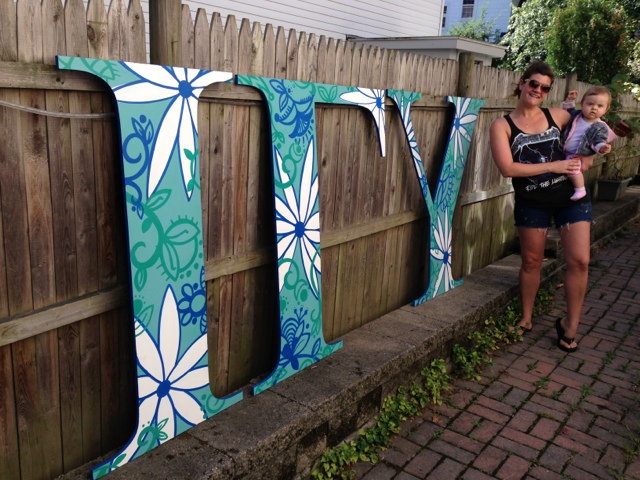
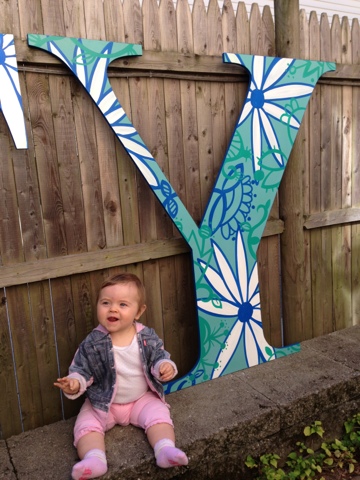
tags: Liz, custom, how to, tutorials, wedding wednesday
Wednesday 09.07.11
Posted by mandee rae
 

the noop


Look! Liz (aka the noop) did a craft show!

Some of her adorable handmade earrings:


A chunky owl:

She made these awesome magnets too!

What a talented Lady!
tags: Liz, etsy, other people's art, the noop
Wednesday 01.12.11
Posted by mandee rae
 

Kind of a Big Deal

 Oh man! 

 Liz and I got asked to paint the windows in the Shapiro
 Building (big deal) on the Souper Salad windows (huge deal) in the
  main lobby where thousands of people pass through daily!!
(HUGEST DEAL!!)
 Here are some close-ups:

I'm off to buy a "Snow Shredder" now and wait for snow!!!

If you'd like a closer look this window mural should be up through January 2011 here.  More pictures here.  Enjoy!
tags: Liz, custom, freak outs, window paintings
Wednesday 12.08.10
Posted by mandee rae
 

Hannah & Justin's Wedding Signs

I painted some signs for a friend's Harvest Fest wedding last weekend;  

 then Fonzie laid on them cause they were so cozy. 

Here are some of them in action:
 (that's the 'Welcome' sign up top there, hard to see it in the sun)

And a couple group shots:


 And last but not least, my ladies helping me paint.  Thanks girls, couldn't have done it without you!!!
tags: Liz, custom, lettering, signs
Thursday 10.07.10
Posted by mandee rae
 

Spring Fever a la the noop!

I took a stroll through my buddy Liz's Etsy shop today and her adorable paintings only served to worsen my already crippling Spring Fever! Look at these adorable little guys!
This dude is the very definition of non-chalant!! Indifference is always in style.
Go check out the rest of her schtuff. And tell her Mandee Rae sent you!
tags: Liz, animals, canvas painting, etsy, other people's art, the noop
Tuesday 02.09.10
Posted by mandee rae
 

She's Crafty


Phewwwwww!!! What a whirl wind!! Liz and I participated in our first craft fair last Saturday and have officially earned our Arts & Crafts merit badges!!

Here are some close-ups of my table that I stayed up until the very wee hours of the morning putting together...complete with white picket fence compliments of Sir Jeremy!


We had such a wonderful time at the craft fair and met a lot of wonderful people and can't wait to do it again!!

Byeeeee!!!
tags: Liz, craft show, etsy
Friday 05.01.09
Posted by mandee rae
 

Countdown to Craft! T-minus 2 days!

It's only 2 more days until my big craftacular debut!! And I only have about half-a-million things to finish before then. Perfect!

www.heirloomartisanexpos.com

There will be painters, jewelry makers, potters, felters, knitters and much much more!!

Hope to see you there!!!
tags: Liz, craft show
Wednesday 04.22.09
Posted by mandee rae
 

My First Craft Show!!

Liz & I will be participating in our first craft show Saturday, April 25th in Franklin, MA!!


www.heirloomartisanexpos.com

It's going to be a great show with donations benefitting Autism Speaks!


Hope to see you all there!!
tags: Liz, craft show
Monday 04.06.09
Posted by mandee rae
 
Newer / Older

Powered by Squarespace.