• Portfolio
  • About
  • Contact
  • Shop
mandee made

hand painted windows, signs & chalkboards

  • Portfolio
  • About
  • Contact
  • Shop

It's beginning to look a lot like Christmas...CRAFTING!

It snowed the other morning.

For me that means it's Christmas time.

So even though it only snowed for 3 minutes and it was mixed with rain and none of it stuck to the ground...it still snowed. And now it's Christmas time!!!

More specifically, it's Christmas CRAFTING time!!  Here are some of my favorite Christmas crafts from years past to keep you busy while I stretch out my glitter coating, wreath making, snowflake cutting muscles. It's important to ease into these things lest you pull something and have to sit out the rest of the season.


           D.I.Y. FIREPLACE         UGLY CHRISTMAS SWEATER

UPCYCLED CATALOG CHRISTMAS TREE


KID-FRIENDLY DIY SNOWGLOBES


I'd love to see any projects you make following my tutorials or any projects you've made on your own!  

Merry Christmas Crafting season!!
tags: before and after, christmas craft, custom, glitter, holidays, hot glue, how to, kids christmas crafts, kids crafts, make me, paper craft, trash to treasure, why dont you make me
Friday 11.15.13
Posted by mandee rae
 

Sadie the Incredible Mermaid Girl: D.I.Y. Traveling Side Show Mermaid Baby Costume


This year was my baby girl's first halloween as a dress-up-able-human and it was imperative that she have the perfect first Halloween costume.  I had originally had my heart set on her being the bearded lady in a side show but when she wouldn't leave the beard on I decided to take advantage of the fact that she's not walking yet and put her in some sort of a sack costume which also meant that I would need to decorate her stroller...which naturally led me to make her the Incredible Mermaid Girl in a traveling side show!


I created her stroller cover using foam core as the fish tank frame; blue fabric, glitter tulle & clear plastic Christmas ornaments for the water; and foam core for the signage & held it all together using a glue gun.  I attached the whole contraption to the stroller (a Britax B-agile) using Velcro Garland Tie and all that was missing was a fat little mermaid to go inside.


Enter one fat little mermaid.  


I have a tutorial on how to make the shell top for the costume here 
& the mermaid tail tutorial is in the works!  

I'd love to see pictures of your home-made Halloween costumes.  Happy Be-lated Halloween!!

Christmas here we come!!!!!!!!!!!!!!!!!!
tags: Sadie Jean, custom, diy, halloween, lettering, mermaid, no sew, paper craft, signs, under da sea
Sunday 11.10.13
Posted by mandee rae
 

Dresser Makeover: Recreating a $799 dresser for $42

Recently I was approached to recreate a beautiful dresser with a staggering price tag.  The Collage Dresser retails for $799 and I'm sure it's well worth it- the dresser is lovely- but "in this economy" (aka the catch phrase of the 21st century) who can really afford it?  The recipient also wanted a decidedly less "shabby chic" version of the dresser with no distressing or faux wear on the paper.

To make this dresser I started out with my basic supplies.  My client already had an old cheap dresser in her house so we saved money on having to buy one though you can always find cheap dressers on Craigslist if you were looking to do this project.   Cost of project: $0.00


I also had some semi-gloss, oil-based white paint left over from another project and used that to paint the dresser.  It's a good idea to use a gloss or semi-gloss on dressers so that you can wipe them down if necessary.  I did 3 coats of the white with a roller.  So far the cost of this project is still $0.00.  Excellent.

I ordered some vintage wallpaper on Etsy from 2 shops, Vintage Sheet Addict and Threads & Memories, I spent about $16 at each shop and the paper is awesome.  There were so many cool designs it was really hard to decide which ones made the cut.  Cost of project now: $32.


I laid the paper out on the drawers and experimented with placement until it looked right. 

One drawer in particular gave me a considerable amount of trouble.   I got it right on the 3rd attempt. 

I glued the wallpaper in place using Tacky Glue and then smoothed it out using a brayer.  (You can find them both at Michael's, AC Moore, Blick, etc.)  This worked better than Modge Podge because since this is vintage wallpaper that's been rolled up for God knows how long- it didn't lay as well as regular paper would and the corners kept curling up on me.  Because the Tacky Glue is true to it's name and "tacky", it was easier to make the edges stick to the drawer.   


Then I spent $10 on some basic black knobs from the Target General Super Store and my dresser was complete.  Bringing my grand total to $42 and some change.  Not bad considering this project was done as a trade- I got to spend a week at my client's house on Cape Cod in exchange for creating this dresser for her.  I think I got the better end of this bargain.

Thanks for coming by!  I hope you liked my project.  If you did, let me know in the comments below and don't forget to go "like" me on Facebook.   (I told my Mom I was popular...I don't want to disappoint her.)

tags: before and after, custom, furniture, makeover, paper craft, recycled, trash to treasure, tutorials, why dont you make me, wood
Friday 07.12.13
Posted by mandee rae
 

OMG! OMG! OMG!I'm Featured on Ecka & Pecka!! (no big deal)

Hey dudes.  I got the best email this morning from a sweet little thing named Meream over and Ecka & Pecka telling me they featured one of my projects on their adorable blog!  Huzzah!

And this little boost could not have come at a better time as I am exactly 6 weeks into my maternity leave today and have been wondering how in the world I'm going to fit painting back into my new life of bottle washing and diaper-figuring-outer-ing.  

It's amazing how such a little thing can help make a girl feel re-energized and ready to paint!  Thank you Meream- you dream boat!  

(Maybe I'll even get the paintings I've been promising my very own daughter done now too....baby steps.)


tags: custom, featured, freak outs, paper craft, recycled, trash to treasure, tutorials
Friday 02.01.13
Posted by mandee rae
 

Stephanie's Cake Fascinator

My beeeeautiful friend, and bride-to-be, Stephanie requested that I make her a piece-of-cake fascinator for her upcoming birthday/bachelorette party.


I started with a cardboard form, iced it with white paint, threw on some pearls and then basically submerged the whole thing in glitter.

The only thing more fabulous than this fascinator is the little lady it was made for- Stephanie I'm so incredibly happy for you and I can't wait to see you in your weddin' dress!!  Tim is a lucky man...but I bet you tell him that all the time.    **MUAH!!**
tags: custom, food, glitter, paper craft, tiny hats, wedding wednesday
Saturday 09.08.12
Posted by mandee rae
 

Makeover Monday: The Red Credenza

Makeover Monday (Tuesday Edition):
The Great Credenza Makeover of 2012


Last Thursday, on my daily trip around Craigslist, I found this beautiful 1960's style credenza living in the garage of the nicest seller in the history of Craigslist for $25 bucks! 
The drawers and the sliding doors turned out to be the only real wood on it.  The rest of it, as far as I can tell, is made of cement mixed with whatever the heaviest thing on earth is.  Seriously, this thing weighs a ton.  Luckily my wonderful (and hilarious!) friend Zach was nice enough to throw on some sweat pants and go pick it up with me.  Thanks Zach!  (Sorry you had to wear sweat pants to class.)

We got it in the house as far as the living room where it had to stay because Zach had to go to class (in sweats) and, as I may have mentioned, this thing weighs at least 300lbs (and I can only bench press 275) so I can't move it alone.  Living room it is.  I began to unscrew the legs...there were 7.  Interesting.  

While it was flipped over I realized that the entire thing was 3 separate pieces connected by 2 brackets and the common top.  I unscrewed the brackets and top, had it quickly inspected by Fonzie and the pieces came right apart.  I love it so much as one piece but at 8' long I have nowhere the entire unit would even fit. 
Plus, now that they're separate I can actually move the pieces all by my lonesome.  Holler!
I sanded everything- doors, drawers, legs, etc.
And primed them with Zinsser.  This was my first time using Zinsser and I love it!  It dried really fast and covered everything.
I painted the outer parts of the credenza (here after 1 coat) with Rustoleum 'Gloss Sunrise Red'.  I chose the Rustoleum because I wanted a high shine and I loved this perfect color red.  The inside was painted flat 'Olivewood' grey.


Now for the doors.  I decided not to prime the doors, just sand them mostly because I didn't want to tape around that little metal handle bit.  Also cause I just didn't think they needed it. 
I put the doors in the credenza where they'll eventually live and traced the line where they overlap.
Next I laid my doors on the amazing decorative paper I'm using to cover them and cut around their outline using an X-acto knife.  Using the line we drew on the second door I allowed for a little bit of overlap so that the image would appear as one piece when the doors are closed. 
Once you're happy with your paper placement Mod Podge it into place.  Cover the entire surface with Mod Podge, lay your paper down and smooth out any air bubbles.  Be sure to work quick, this stuff dries fast.  When it's in place, cover the entire surface with Mod Podge.  (It's a good idea to use M.P. Hard Coat for this project.)
At first the glue will be cloudy but never fear, it will dry to a beautifully clear finish in no time.  I chose a matte finish and also decided to cover the second set of doors with a 2nd paper option because I just couldn't pick one.

I put the top back on, screwed on the legs and slid the doors in and the results are a sophisticated yet playful piece of furniture that I absolutely adore.  I cannot wait to fill it with carp...I mean crap. 

***TIP from my Mom***
Instead of wasting time cleaning paintbrushes that you're just going to use again for the second coat, wrap them in plastic wrap or a grocery bag and pop 'em in the freezer until you're ready for the next coat of paint.  This way you only have to wash your brushes once at the end of the project which will help seriously reduce the desire to just abandon the project halfway through because washing paint rollers is such a gigantic paint in the a**.  Thanks Lady!
tags: antiques, before and after, custom, diy, freak outs, home decor, how to, paper craft, trash to treasure, tutorials, why dont you make me, wood
Tuesday 03.20.12
Posted by mandee rae
 

How to make a block printed Valentine post card


Second printing of the 'I think you're GREAT!' Valentine post card in red.

1. 

2.

3.


Click HERE for more detailed instructions.
tags: how to, kids crafts, lettering, make me, paper craft, the compliment shoppe, tutorials, valentines day, why dont you make me
Thursday 02.09.12
Posted by mandee rae
 

Make Me: DIY Pull Tab Valentine Card

Why Don't You Make Me?

D.I.Y. Interactive Pull-Tab
 Valentine's Day Card/Decoration

1. Receive card

2. Pull Tab

3. Happy kid

Making this adorable, pull-tab Valentine's Card for my niece was so worth the little bit of extra effort it entailed.  She was so excited to PULL HERE and see all the letters come out!  Start-to-finish this card probably took me a little less than an hour. 
Here's how to make your own:

First, gather your supplies:
1 piece red card stock
1 piece coral card stock
1 piece pink construction paper
hole punch/grommet smashin' machine
grommets
scissors
tape
Sharpie
embroidery floss
embroidery needle

To begin: seperate pink paper into 20 equal pieces and cut out.


Then write "HAPPY VALENTINE'S DAY!" giving each letter their own square.


Now cut red paper into rectangles about the size of a stick of gum.

Using your hole punch, make a hole on either side of each letter and on either side of the red strips of paper.

Use the red strips to connect the letters. 

Lay a pink square on top of a red strip, align the holes, insert a grommet & squish using a grommet squisher.


Repeat until you've used all your letters and add a PULL tab on the left hand side in front of the 'H'.


Next, make the envelope using a pink piece of paper about 12"x14".


Fold in half lengthwise and begin to attach banner to card. 

To strengthen the anchor-point I cut a piece of card stock and added a grommet. 
Using a piece of string about 2" longer than the card, tie one end to the end of the banner.

Slip the other end of the string through the reinforced grommet, pull through and tape the string down on the backside of the card.  I added a heart to make it pretty afterwards.

Now comes the most difficult part of this card, fold the letters on top of each other without getting them tangled so that they come easily out of the card via the PULL tab.  Begin with the "y" and zig-zag the rest of the letters keeping the next letter on top until they all fit in the envelope.  To get this right I had to fold and pull about 4 times.  Trial and mulitple errors. 
Then, using your red embroidery floss and embroidery needle, sew the envelope shut being careful not to sew any of the letters to the envelope!  

The thread adds a cute decorative element and is actually much easier than gluing the envelope shut and risking getting any of the letters stuck in it.  Remember to leave a space on the left hand side for the letters to come out.


happy crafting!
tags: how to, kids crafts, lettering, make me, paper craft, tutorials, valentines day, why dont you make me
Wednesday 02.08.12
Posted by mandee rae
 

Pop-Up-Heart Trader Joe's Valentine Card

I made this Valentine for a friend of mine who tragically *dramatic pause* lives in a Trader Joe-less part of the country.  **Cue inspirational music**  A part of our great nation where grocers don't wear Hawaiian shirts and two-buck-chuck is a story heard only in fairy tales.  I hope to, within my lifetime, see a world where everyone can get fat free black bean dip and Orangeboom regardless of their geographical location!  Where Oklahoma and Arkansas can share not just a border, but a love for free samples!  Can I get an amen?!
For this project you will need:
  • one piece of red 8.5x11" cardstock
  • one Trader Joe's bag
  • scissors
  • a glue stick
  • a sharpie
  • a cat butt (optional)
Step 1: Start out by laying your cardstock on your cut proof mat.  For quality control purposes your cat should immediatly come sit on whatever it is you're doing and act like she doesn't see you.  Once you've passed this rigurous inspection process move on to Step 2.
Step 2: Fold paper in half (use handle of scissors to create a nice crease) and cut along fold.
Step 3: Fold both halves in half again to create a card shape.
Step 4: With paper folded in half, draw the outline of 2 hearts on one of the pieces of paper.  The outer heart should leave a space at the farthest edge connected to the paper.  Leave about 1/2" connected. 
Cut outer heart (leaving 1/2" connector!) and fold back.
Then cut the inner heart out entirely.
Leaving you with this cute pop-out-heart card.
Step 5: Cut the side out of a T.J.'s bag (this is technically upcycling) and place your card over it to frame your image. 
(I decided on the wine bottle with a trace of the "traderjoes.com" visable just in case my recipient a. doesn't realize what the background is or b. doesn't check my blog.  In either case, she's kind of a jerk.)
Step 6. Now, glue the background to the back of the card, making sure not to glue down the heart or else it won't pop-up anymore.
Add the other half of the cardstock to the back of the card to make it pretty.
Write your message and you're done!
One of the great things about this card is that it makes you seem sweet, wanting to share a little piece of Trader Joe's with someone less fortunate but in reality you're kinda just rubbing it in their face.  Awww, I love friendship.  Happy crafting!
tags: how to, paper craft, trash to treasure, tutorials, valentines day, why dont you make me
Thursday 01.19.12
Posted by mandee rae
 

Why Don't You Make Me?: Block Printed Valentine's Card


This Valetine's Day, spread some love (that won't result in a rash) by making this handcarved, handprinted, hand-addressed, snail mailed Valetine for your Sweetie. 

For this project you will need:
  • 1 carving block
  • carving tool(s)
  • pencil/eraser
  • a brayer (or a paint roller)
  • a scrap piece of cardboard
  • a spoon
  • cardstock or thin cardboard to print on
  • a stamp
To begin, draw your image directly onto the carving block using a pencil with a slightly rounded tip.  *If the tip is too sharp it will puncture the surface and not mark properly.*  If you've chosen to do words, keep in mind that you will need to write the words backwards onto your carving block.  Luckily for me, writing backwards is my secret super power. 
  (I'm the first to admit this is not a terribly useful super power but it's the only one I've got so please try to act impressed.)
When you're satisfied with your design, begin to carve out the area around your letters using your carving tool.
Continue to carve until you're happy with your image. 
Next, prepare your brayer.  I don't have a brayer so I used this small paint roller that I have.  Using some cardboard as your surface add some acrylic paint and roll it until your roller/brayer is evenly covered.
Then roll the paint onto your carved block until it is also evenly covered.
Now, rather than picking up your block and trying to set it down on your printing surface, bring your printing surface to your block.
Lay the paper down on top of the freshly inked surface and using the backside of a spoon, rub the back of the paper to burnish the image onto the paper.
 (Thanks for teaching me that trick (and word) Atara!)
Remove paper and there you have it!
For an added touch, add glue to the heart,
and coat in Glitter, obviously.
When the paint & glue is dried, turn over and address your post card to the lucky recipient of your choice, add a stamp (it may cost slightly more than a regular post-card stamp, check with the post office) and drop it in the mailbox. **
There is nothing more special that recieving something handmade from someone who loves you...except for recieving money maybe but I don't know how to make that.

Happy Valentine's Day!

**If you don't have a Valentine my co-worker Zach said you can just send the card to him, because he's a giver.

*     *     *     *     *     *     *     *     *     *     *     *     *     *     *     *     *     *

Inspiration for this project came from Jennifer's amazing Christmas card:
Thanks Jennifer!
tags: glitter, how to, lettering, paper craft, trash to treasure, tutorials, valentines day, why dont you make me
Monday 01.16.12
Posted by mandee rae
 

Adorable 3D Lollipop Valetine Tutorial

I made an executive decision earlier this week- I am going to hold off doing Valentine's related crafts and having Valentine's related freak-outs over crafts until this Saturday (the official 1-month countdown to V-Day).  That was until Karen & Ella (not their first time here) sent me this adorable DIY Valentine that they made to give to Ella's classmates and I realized that everyone else is already elbow-deep in Conversational Hearts and I'm still putting Christmas away.
So now I've veto'd my own executive decision and decided to grab cupid by the horns and get my Valentine's on.  Starting with this:

Karen & Ella's
Adorable 3D Lollipop Valentine's Card
From Karen:
So here is how you make the super cute DIY Valentine's Cay Cards. First find a super cute kid, most parents think thier kid is the cutest, if so, then go with them. If not, I have one you can borrow. Next, get your camera ready. Have your little cutie stand up against a wall and extend their arm toward the camera while making a fist. Snap away. Try to stay focused on the face. You would rather the hand slightly blurred and not the face. Download your pic to your computer and then upload to picnik.com. Here is where the fun takes place. Add borders, hearts, etc. I kept it simple. I wrote "Happy Valentine's Day" toward the top and "your friend," toward the bottom. I left out my daughters name because I let her add it with a sharpie to make it more personal. Send the pics to your local CVS.  I bought a bag of dum dums. Slice a tiny slit over the fist and insert you pop. Place a piece of tape on the back side. You can add the adhesive card stock to the back to firm up the card but I left it as is to save on the cost.  FYI- I also tried blow pops but they were too big. Also worth noting, when adding text to you pic on picnik-don't add to very top or sides. My sisters first round cut off part of the letters, I made some adjustments and lowered the text and they came out perfect.

Here is where I first saw this fun idea.

So cute!  Thanks for sharing Karen!!
tags: custom, girls room, how to, kids crafts, lettering, other peoples art, paper craft, tutorials, valentines day, why dont you make me
Thursday 01.12.12
Posted by mandee rae
 

One Last Christmas Post: the Christmas Diorama


In December I helped my friend, photographer Kristen Mallory, make this awesome diorama to use as the backdrop for her annual Christmas card.  I couldn't share it until now because it would have blown the surprise!  (ok, technically I could have posted it anytime after Christmas but I was procrastinating busy.)  It came out so cute.  I was thrilled when I saw the finished product in my mailbox!


Above is a picture of the card in the diorama.  Pretty advanced stuff, I know.


To make it we covered a box (stolen from my cats) with pictures we cut from magazines.  Blues for the sky, some glaciers for the backdrop, greenery in front and one cup of coffee as a mountain in the front. 


Then we filled it with gnomes, forrest creatures, a peppermint disc tree (made by Kristen), mini twinkle lights & some moss and Kristen took pictures of it.  (It's amazing what a good photographer can do.)  


Ok, that was my last Christmas post of the season.  Honest.  No more.  Scouts honor.  I'm done.


xoxo, ~mandee rae
tags: animals, christmas craft, kristen, make me, paper craft
Tuesday 01.10.12
Posted by mandee rae
 

25 Cent Word!: Anthropomorphic

I learned a new word- anthropomorphic - suggesting human characteristics for animals or inanimate things, please be prepared for me to throw it around all the time now.  I feel like I just found out about jeans or something.  Like the entire world new there was a word for creepy smilinging vegetalbes, little girls with apple heads and hot dogs with faces happily grilling themselves except me.  It wasn't until I was using every single adjective in my vocabulary AND both hands trying to describe "those creepy teapots with faces...from the 50's...shaped like apples...you know?" that my sister-in-law said, "you mean like an anthropomorphic teapot?" 

Gah!  There's a word for that???  Amazing.

Now would be a great time to check out my brand new Anthropomorphic Label!

tags: animals, anthropomorphic, antiques, art show, etsy, freak outs, illustrations, kittehs, other peoples art, paper craft, stick figures, tchotchke, treasury
Tuesday 01.03.12
Posted by mandee rae
 

Fireplace From a Box: Instructables Box Challenge

My cardboard fireplace for the Weekly Make It Challenge on Instructables.com.  This week's challenge was to make something from a leftover Christmas box. 

Here's my entry and how I did it:

Step 1.
Get a box.


Step 2.
Draw an upside-down "U" on the front. 
Cut it out using an X-acto knife or scissors (careful dummy!)


Step 3.
Paint faux bricks on box using non-toxic acrylic craft paint. 
Fill in remainder with grey paint (optional).
Step 4.
Draw the outline of a flame on another piece of cardboard and cut it out. 
Step 5. 
Arrange fireplace and flames and decorate inside with red christmas lights for the fire.

Step 6. Enjoy!


Someday I'll have a real life fireplace until then it's cardboard and christmas lights for me.
tags: animals, christmas craft, crazy cat lady, custom, kids crafts, kittehs, make me, paper craft, tutorials, why dont you make me
Wednesday 12.28.11
Posted by mandee rae
 

Up-cycled Catalog Trees: DELUXE EDITION


Yesterday I showed you how to make Up-cycled Catalog Christmas trees.  


Today, I'm going to show you how to take those regular trees (left)and make them DELUXE! (right).
**It should be noted here that in my country "deluxe" is a synonym for "has Glitter on it."

Beginning at Step 4 from yesterday's project with the catalog completely folded into standard tree form-
Next begin folding the bottom corners of each page up toward the spine of the catalog.

**Fold in about 2 inches, leaving enough space at the bottom of the catalog for the tree to form a base to stand on.**

Continue folding each page until you have something resembling this:


And finally, get out your Glitterin' kit:
  • mod podge (or Elmer's glue)
  • Glitter (Random Disco or otherwise)
  • a paintbrush

Put a thin layer of glue on the top of your tree.

Dump a mess of Glitter on there,
shake off the extra aaaaaand....
...you're done! 

Now all you have to do is find the perfect place to display your creation.  Mine made a brief appearance on this shelf before settling in as the table centerpiece. 


Beautiful.  And more importantly easy!

***Sister thought it was important to mention here that you can also paint your trees.  Spray paint would be your best option but if you have a catalog tree made from non-shiney paper like the one below, a simple tempera paint would work just fine.***


Happy Crafting!
tags: christmas craft, glitter, how to, kids crafts, make me, paper craft, tutorials, why dont you make me
Wednesday 12.07.11
Posted by mandee rae
 

Why Don't You Make Me?: Upcycled Catalog Christmas Trees

Why Don't You Make Me?
Upcycled Catalog Christmas Trees
Lady, my Mom, taught me how to make these paper Christmas trees when I was about 4.  She was Sister's Brownie Troup Leader and always brought me to their meetings.  They're super easy to make, a great project for kids and an easy way to add something homemade to your Christmas decorations.  Not to mention, they're upcycled so you can throw that fact around a bunch and totally impress your friends,  "oh these?  they're upcycled."  People love that sort of thing.

Step 1. 
Pull all the Christmas catalogs that you threw in the recycle bin back out. 


Step 2. 
Pick a winner. 
**Try to pick a catalog with at least 50 pages.**
Step 3. 
Open 'er up.


Step 4.
Fold the front cover toward the spine. 
Fold the remainder of the pages the opposite direction.

Keep creasing the pages until they are all folded.

Step 5.
You're done.  Stand back and be all, "look what I made, that's adorable."
**If your tree won't stand up your catalog might not be thick enough.**

Step 6: OPTIONAL: Create a catalog tree forest.

Happy Crafting!!
tags: christmas craft, how to, kids crafts, make me, paper craft, trash to treasure, tutorials, why dont you make me
Tuesday 12.06.11
Posted by mandee rae
 

Out of candy!!

                                                                                   Drawing by Liv Chaffee
And just like that...Halloween was over.  


tags: food, halloween, other peoples art, paper craft, pumkins, quote bubbles
Monday 10.31.11
Posted by mandee rae
 

Wedding Wednesday: Tchotchke Centerpiece/Favors


...and with a little less than 5 hours left of this beautiful, rainy Wednesday I bring you:
 
                                                                                                              Picture by Kristen Mallory
WEDDING WEDNESDAY: 
TCHOTCHKE EDITION! 

For a full year before my wedding I collected tchotchkes from junk shops, second hand stores, garage sales and of course, Etsy to create my combination centerpiece/favors. 
There were a couple of rules for collecting these hollow treasures, they needed to be:
a. planters
b. under $7 (american currency) and
c. a little "off"....not exactly ugly, just "off".
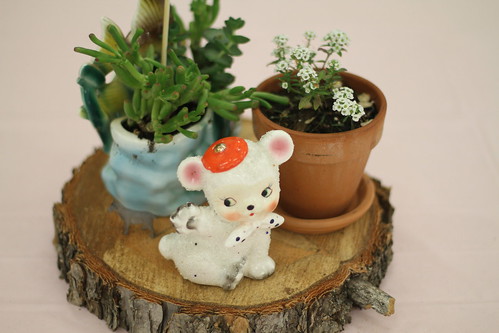
To make them into centerpieces was truly a family affair.  We (my 4 year old flowergirl, Sister and I) planted succulents in all of the tchotchkes, put them on wooden disks (cut especially for me by my loving Father), accompanied them with precious little terra cotta pots filled with small white flowers (put together by Lady, my Mom) added hand stamped signs (Made by Liz) that said, "take me home tonight!" and then they were all artfully arranged on each table by my BFF, Gina Marie.
Pictures by Meredith Mascola
The results were 100% unique, semi home-made, adorable little bits of precious that I could hardly stand to give away!!  These were SUCH a huge hit I was blown away!  People were hiding them from each other and stealing them off tables all night.  I personally saw the squirrel change hands at least 3 times, I'm still hearing stories about who the rightful owner should be.  And now the fun part is finding out where all of them went.  I love going to friend's houses and seeing which planter everyone ended up with (aka who swiped what while no-one else was looking!) 
  
tags: Liz, antiques, custom, dogs, etsy, faux bois, kittehs, kristen, make me, paper craft, signs, tchotchke, the noop, wedding wednesday, wedding
Wednesday 10.19.11
Posted by mandee rae
 

Mini Paper Taco Trucks

These mini paper taco trucks are
 so cute and they're yours for the folding!

Just print out any of these adorable little trucks below...
follow the dotted line, cut them out and fold 'em up.  So rad!
tags: national taco day, other peoples art, paper craft, taco tuesday, tutorials
Monday 09.26.11
Posted by mandee rae
 

Know When to Hold 'Em

I finally gave up on making the thank you cards for my wedding and ordered these adorable cards on Etsy from a shop called Yee Haw!  They have so many cute designs it was really hard to decide what to get.  I settled on the standard 'THANK YOU!' on a post card.  They came with envelopes and a bunch of little extra 'Gracias' & 'Merci' mini cards all printed on an old school letterpress by a human on recycled cardstock.  

So so cute!  Now I just have to send them out.  First things first.


 I also wandered over to Brookline Booksmith in Coolidge Corner and bought this little gem for my super hero loving niece's upcoming birthday.  It's from a UK company called 'Toasted' which is a blog "showcasing contemporary design and illustration" that also produces a line of cards.  The artwork on the card is titled 'Heros and Villains' by Jack Teagle.

Who also happens to be my new favorite artist:
Awesome-town.

tags: etsy, lettering, other people's art, paper craft
Thursday 07.07.11
Posted by mandee rae
 
Newer / Older

Powered by Squarespace.