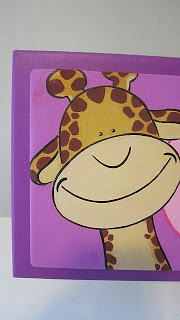
Eliza's Name Plate


Name plate and frame painted for Little Eliza's animal themed nursery. Eliza's God-Mother ordered this 2-piece set to match the walls of her first God-Daughter's kiwi green and purple room.
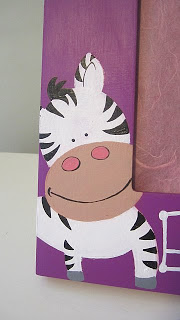
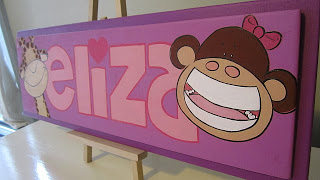
Hand painted wooden name plate sign ($45) also painted in coordinating shades of custom purple and decorated with a happy giraffe and a little girl monkey with a huge grin. This name plate was made using 2 pieces of wood painted and glued together to give the artwork a little more pizzaz. Which is what every little girl's room needs, isn't it?

Customizable sets like these make wonderful birthday, baby shower and of course, Christmas gifts and for only $70 (price dependant on size and amount of detail) you really can't go wrong. Order yours now!!
***Accepting Christmas orders through Dec. 5th this year due to holiday travel mid-month.***
Thank you! Thank you! Thank you!
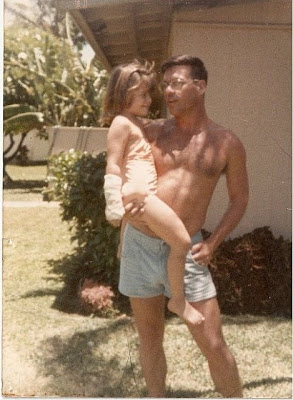
This is my favorite veteran, my Dad, Chief Warrant Officer III Martin (Retired), USMC. My Dad served 24 years as a weapons specialist in the Marines, did 2 tours in Vietnam, spent a year overseas in the Gulf War and was a wonderful Father to me and my sister in the meantime. I'm so proud of him every day and especially proud of him today on Veteran's Day.
If you're looking for a way to thank a veteran this Veteran's Day, there are endless opportunities for support available online. Here are some options:

- Become a pen pal to an active duty soldier
- send a care package
- organize a Christmas card campaign
- volunteer to help Vets that have already returned home
- donate money to a Veteran's association
Or, of course, you can just thank a veteran you see on the street today. You don't have to agree with the war to support the men and women risking their lives to fight in it. Freedom isn't free. Thank you for being braver than I could ever be.
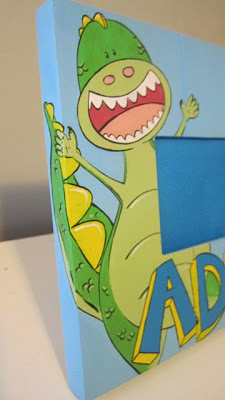
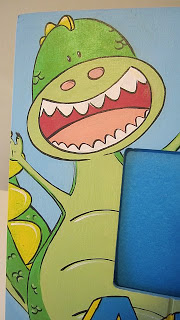
Aden's Pet Dinosaur
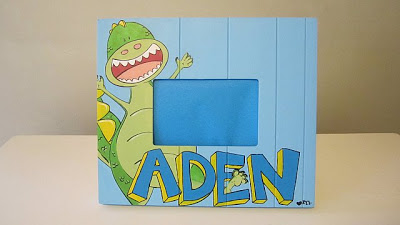
Just listed this custom picture frame for Aden on my Etsy page.
***I will only accepting Christmas orders until Dec. 5th this year because of holiday travel mid month so please get your order in soon if you'd like to commission a custom piece of artwork.***
Christmas is only 45 days away!!
Contact
For pricing or to commission a painting email me here.
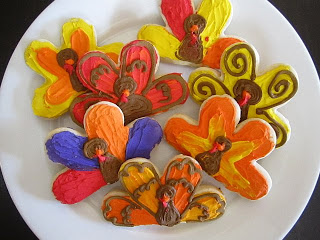
Shut Yer Mouth, Jive Turkey!
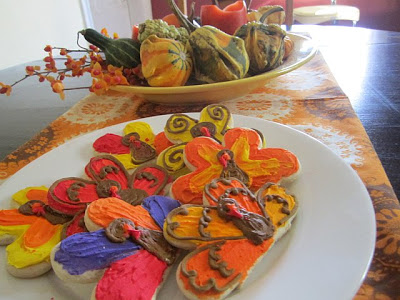
Last week I went to two major chain craft stores looking for a turkey cookie cutter for this project. When I asked if they had turkey cookie cutters both stores answered with:
"Oh, all that stuff's packed away to make room for Christmas."
Shut your face! What? It was November 4th!! Since when does Christmas start in October, take over all of November and get the full month of December? Geezum crow! Some of my most favorite people on the planet were born in November: my Mom, husband, nephew and my stupid brother-in-law who I love even though he always tries to make me think I have a lady mustache.
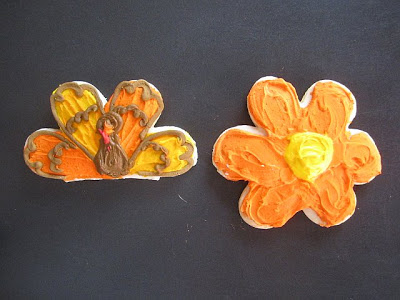
Determined now to make turkey cookies and celebrate the crap out of Thanksgiving I tried to think of what else I could use as a turkey form. That's when I saw this flower cookie cutter. By cutting of the bottom two leaves it actually makes a pretty adorable turkey.
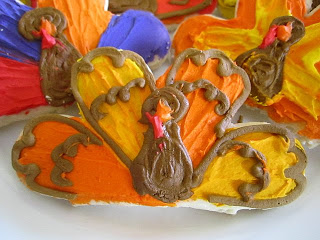
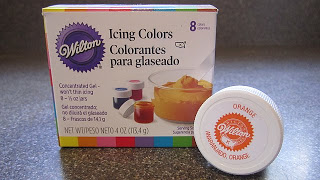
I used Wilton gel Icing Colors to get the colors super vibrant. I can't recommend it highly enough even though my tongue is totally red from taste testing a cookie (ok, 3 cookies).
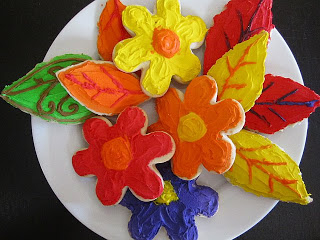
Happy Thanksgiving!!
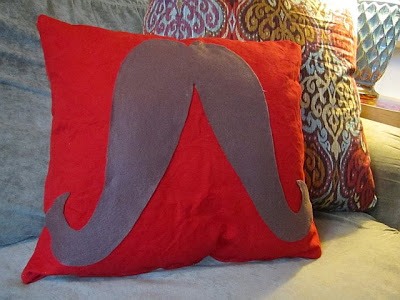
Why Don't You Make Me: Canvas Mustache Pillow
First, gather your supplies-
- about a 1/2 yard of canvas material ($2.00, Blick)
- some brown felt (had on hand)
- red fabric dye ($3.39, Blick)
- a 20"x20" pillow form ($15.00, Michael's)
- sewing machine/needle and thread (had on hand)
- scissors
- hot glue gun/hot glue (had on hand)
- black fabric paint (optional)
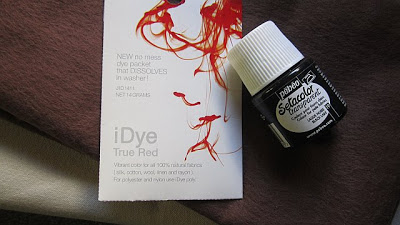
Dye Fabric
Start out by washing and dying your fabric. It's always a good idea to wash your fabric before dying because fabrics may have invisible stains that will effect the evenness of dyeing.
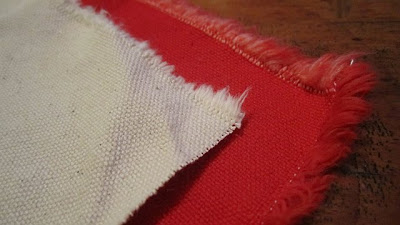
I used True Red by iDye and dyed my fabric according to the stovetop method.
Construct Pillow
The next step is to construct your pillow. If you don't sew or if you've never made a pillow, HGTV has an easy to follow how-to on their site. Basically it's cut to size, sew 3 sides together inside-out, flip right-side out, slip over form, sew closed, and Bob's your uncle.
Apply the Mustache
Now that you have the pillow made, prepare your mustache. To make my mustache I cut a piece of felt the same size as my pillow, found the center and folded it in half once. Then, I free hand drew half a mustache on it.
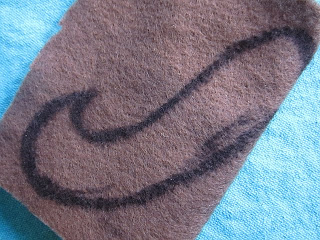
I then cut it out, keeping the material folded in half to create 2 equal sides.
When you unfold the fabric, you have a perfectly symmetrical mustache.
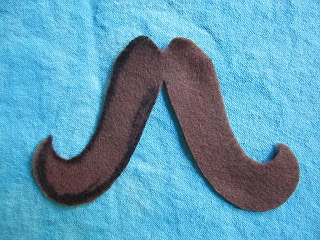
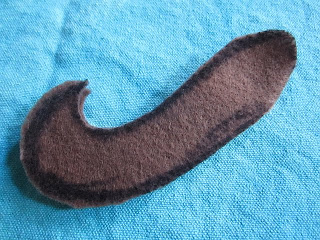
OPTIONAL: For more detail, use either black fabric paint or a sharpie to create individual hairs:
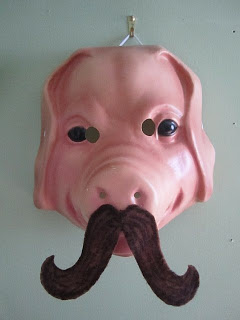
***It is important at this point to remember that mustaches make everything funnier/creepier.*** From this already creepy pig mask,
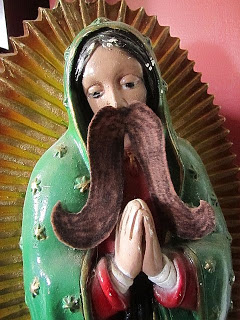
to the Virgin Mother herself...
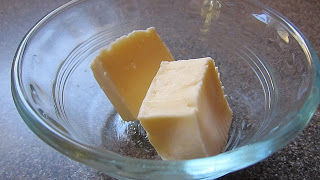
and all the way down to googley-eyed butter dishes...

***everything is funnier (and creepier!) with a mustache on.***
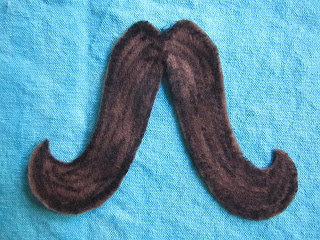
Next, with your preheated glue gun, run a small line of hot glue as close to the edge of the mustache as possible and place it on your pillow. Press into place and you're done!
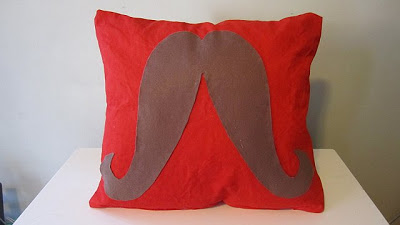
You'll be the talk of the town!
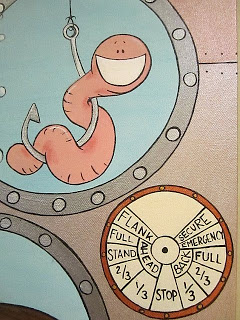
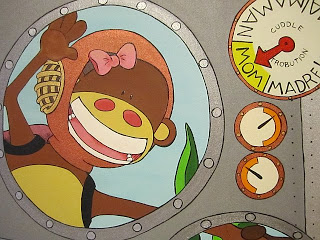
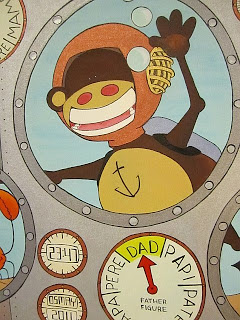
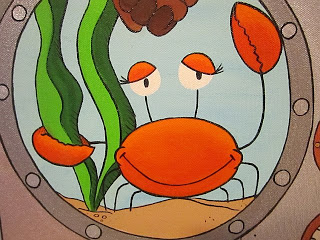
The USS Harlan Richardson Moore
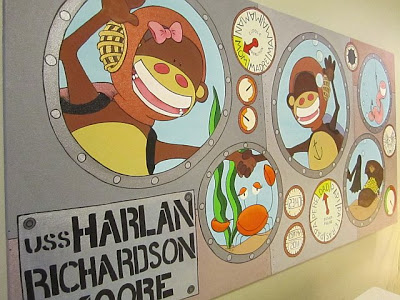
I just finished this painting for a little boy named Harlan to hang in his nursery. Harlan has a big brother named Lucian, you may remember his monkey pirate ship painting from last year.
Here are some more pictures of the painting or go check out the slideshow.
The Cuddle Distrobution gauge is set to Mom.
While the Father Figure dial is clearly reading Dad.
(In real life Harlan's dad has a much larger anchor tattooed on his chest.)
A tender little crab.
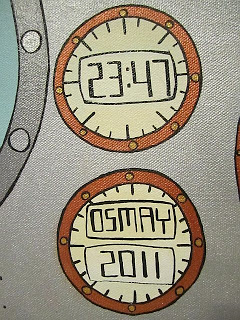
Harlan's name is the ship's namesake.

And his date and time of birth are represented in the gauges below:
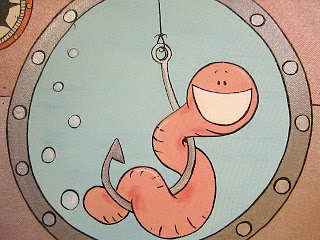
This worm obviously hasn't been informed about why he's at the end of a fishing line wrapped around a hook. Ah, sweet ignorance.
Contact me if you'd like to order a custom painting or for pricing.
Thanks for looking!
the devil you say!
National Deviled Egg Day is here again and I'll tell you what, it just sneaks up on me every year. I mean, you hardly get past National Brandied Fruit Day and BAM- National Deviled Egg Day is here. It's so hard to keep up!
Because of my lack of preparedness for this holiday I turned, as I often do, to Etsy and I was eggs-cited to find eight pages of deviled egg related items in my search. Eggs-cellent!
Here's a yolk for ya:
Q: What did the wicked chicken lay?
A: Deviled Eggs!
Because of my lack of preparedness for this holiday I turned, as I often do, to Etsy and I was eggs-cited to find eight pages of deviled egg related items in my search. Eggs-cellent!
Here's a yolk for ya:
Q: What did the wicked chicken lay?
A: Deviled Eggs!
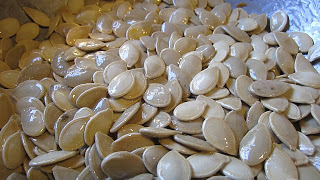
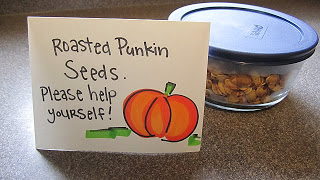
Make Me: Spicy Roasted Pumpkin Seeds
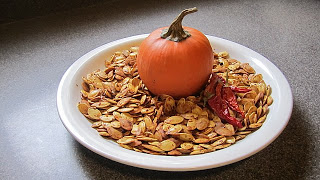
After carving a small army of Jack-o-Lanterns to light up my porch for the trick-or-treaters this year, I was left with a fridge full of pumpkin guts. To combat these gourd-esque inards I found this awesome recipe for Spicy Roasted Pumpkin Seeds on SeriousEats.com.
The ingredients you need for this recipe are:
- 1 1/2 cups pumpkin seeds
- 2 tablespoons melted butter (or olive oil)
- 1 tablespoon red pepper flakes
- 1/2 teaspoon smoked paprika
- 1/4 teaspoon cayenne pepper
- salt to taste


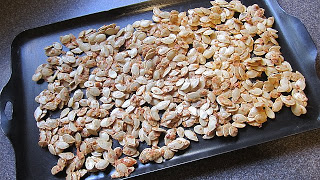
When the seeds are coated, add your spices and mix thoroughly using a spatula-

Lay your seeds on your greased baking sheet single file and bake 30 minutes (stirring occassionally).
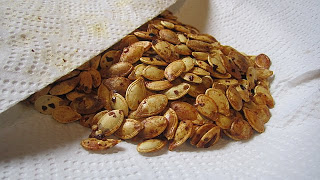
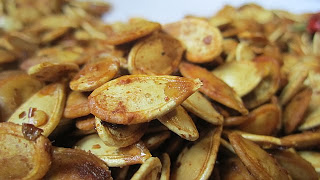
Once out of the oven, put them in a paper towel sleeping bag to soak up the extra butter before serving to your friends.

Out of candy!!
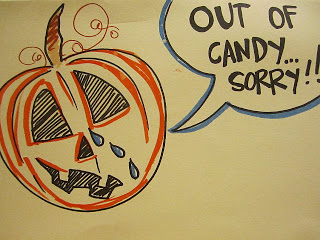
HAPPY HALLOWEEN!
National Candy Corn Day of the Day!

Personally I don't really like candy corn anymore but childhood me used to house them by the bag. I used to eat them white-to-yellow, eating the white and orange first and then saving 2 yellows to stick together and make one big yellow piece. Why I did that I'm not sure but it's a clear childhood memory that comes back to me every Halloween.
For more National Candy Day revelry here's a clip from Unwrapped about how Candy Corn is made:
And also, as long as we're here, a how-to video on making adorable candy corn nails!
Holler!
Mike Wazowski! Mike Wazowski! Mike Wazowski!
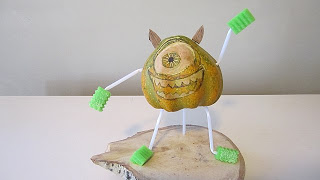
My entry for the pumpkin carving contest was a little gourd that just naturally looks like Mike Wazowski from Monsters Inc. All I had to do was carve out his eye and mouth, stick some arms on him (expired mouth swabs from work) and give him some horns (cardboard) to make him come to life.

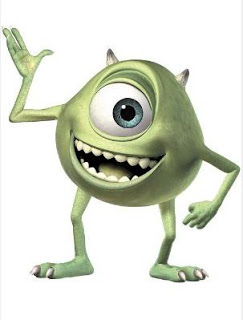
Here he is next to real life Mike Wazowski. They could be cousins!
Honorable Mention
It's always nice to be featured in someone's treasury. It's especially nice when they're as beautiful as this one put together by Candace Rasmussen of KnottyTots.
Thanks Candace!
Thanks Candace!
Bliss in the Mail

I am in the middle of a never-ending (and very laaaaaazy) quest to find the perfect fabric to cover the throw pillows on my couch. Earlier this Summer I thought I had it all figured out....and then I got a new rug that threw everything off. Damn! This quest recently brought me to my friend Aurora's Denver fabric store/craft shop/knitting studio website, Fabric Bliss, simply to get some ideas from her fabulous fabric selection. That's when I found out that Fabric Bliss now has an online store! Shit ya!

The 2 fabrics I decided on were this delicious grey, yellow & white Ty Pennington design that looks hand screened and is going to make a gorgeous pillow (someday)
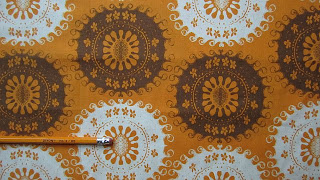
and this really awesome Tapestry print in carrot by Tina Givens.
Now, before you point out that these prints totally clash, you should know that they're for pillows on different couches in different houses- a friend of mine is also in the throws of pillow covering angst. The horror! One of my favorite things about ordering on Fabric Bliss was that you can order in 1/4 yard increments!! Which is so rad because if you've ever gone to a fabric store and been told there is a 10 yard minimum on a fabric that you just want a little taste of you know how annoying that is. I ordered 3/4 of a yard of the Tapestry print just to excercise my rights. Love it. The fabric came super fast, USPS Priority Mail with a cute note and a smiley face.
If you're in the market for fabric or yarn you should go check out the site. You'll be supporting an awesome girl with great taste and getting some fabulous fabric. Tell her Mandee sent ya!
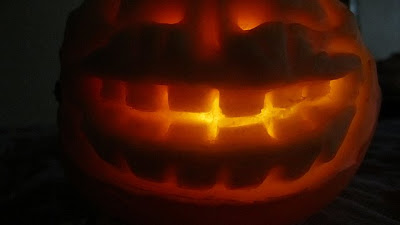
3 Days 'til Halloween!
With only 3 days until Halloween, the pumpkin carving in my house is getting serious.

Come back tomorrow to see our entry in a local Pumpkin Carving contest!
Happy National Pumpkin Day!
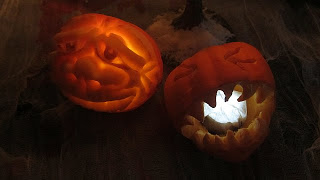
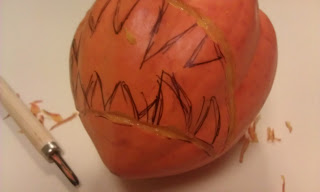
Yesterday, motivated by my work's annual Pumpkin Carving contest and by the fact that today is National Pumpkin Day (no lie!) I turned this...
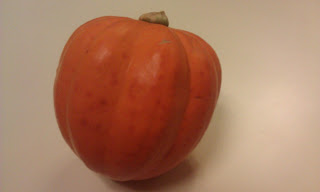
I've never attempted to sculpt a pumpkin, I generally just carve a 2-D face and call it a day but I was feeling particuarly ambitious, motivated by a mystery prize from work, and wanted to try my hand at sculpting my gourd this year.
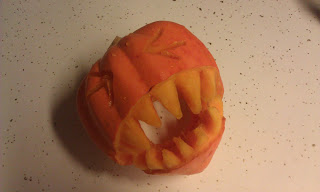
...into this!
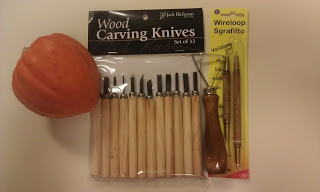
I went to my local art store at lunch and blindly bought these tools to use. What I found was that it's important for your tools to have a sharp edge to be able to slice through the pumpkin, the wire end sculpting tools and the wood carving knives were my best purchase while the wireloop sgrafitto, though it had the coolest name, was pretty useless in terms of pumkinery.
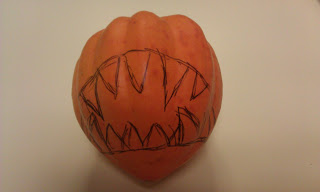
Next I drew a big scary mouth on the face of my "pumpkin" (which you may have noticed is actually an acron squash) and started carving. I used a carving knife to go along the entire outline of my drawing,
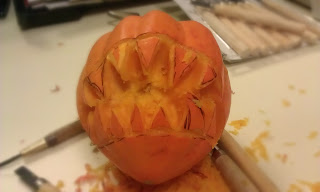
and then started gutting it out with the wire-end sculpting tools until each tooth was free. Then I took the skin off each tooth and shaped them so they'd be wicked scary, carved some squinty eyes and Viola!


My first 3-D punkin!
It was easier than I thought it would be, I think I'm hooked.
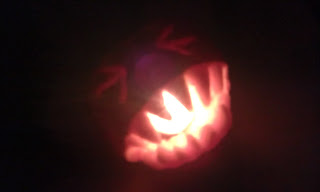
Stay tuned for the Pumpkin Carving Contest (this Friday the 28th) entry and results!
Happy National Pumpkin Day of America!!!
6 Days to Halloween!
We're almost there!!
National Pumpkin Cheesecake Day!
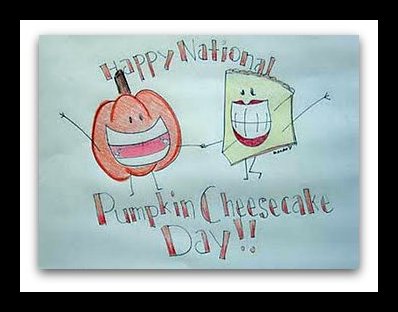
This is truly a cause for celebration, National Pumpkin Cheesecake Day? Yes please!
To celebrate, Liz and I made this deliciously simple pumpkin cheesecake last night.
I let it sit over night in the fridge to set up
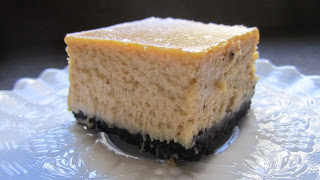
...and then, because you should always test your work, I had a piece for breakfast (it's like a pastry, what?) and I'm happy to report it was delicious!!
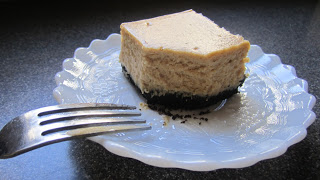
Here is the recipe we used. Happy baking and happy National Pumpkin Cheesecake Day!
**Please celebrate responsibly.**